23 KiB
| layout | title | parent | nav_order |
|---|---|---|---|
| default | Pose | Solutions | 5 |
MediaPipe Pose
{: .no_toc }
Table of contents
{: .text-delta } 1. TOC {:toc}Overview
Human pose estimation from video plays a critical role in various applications such as quantifying physical exercises, sign language recognition, and full-body gesture control. For example, it can form the basis for yoga, dance, and fitness applications. It can also enable the overlay of digital content and information on top of the physical world in augmented reality.
MediaPipe Pose is a ML solution for high-fidelity body pose tracking, inferring 33 3D landmarks on the whole body (or 25 upper-body landmarks) from RGB video frames utilizing our BlazePose research that also powers the ML Kit Pose Detection API. Current state-of-the-art approaches rely primarily on powerful desktop environments for inference, whereas our method achieves real-time performance on most modern mobile phones, desktops/laptops, in python and even on the web.
| Fig 1. Example of MediaPipe Pose for upper-body pose tracking. |
ML Pipeline
The solution utilizes a two-step detector-tracker ML pipeline, proven to be effective in our MediaPipe Hands and MediaPipe Face Mesh solutions. Using a detector, the pipeline first locates the person/pose region-of-interest (ROI) within the frame. The tracker subsequently predicts the pose landmarks within the ROI using the ROI-cropped frame as input. Note that for video use cases the detector is invoked only as needed, i.e., for the very first frame and when the tracker could no longer identify body pose presence in the previous frame. For other frames the pipeline simply derives the ROI from the previous frame’s pose landmarks.
The pipeline is implemented as a MediaPipe graph that uses a pose landmark subgraph from the pose landmark module and renders using a dedicated pose renderer subgraph. The pose landmark subgraph internally uses a pose detection subgraph from the pose detection module.
Note: To visualize a graph, copy the graph and paste it into MediaPipe Visualizer. For more information on how to visualize its associated subgraphs, please see visualizer documentation.
Models
Person/pose Detection Model (BlazePose Detector)
The detector is inspired by our own lightweight BlazeFace model, used in MediaPipe Face Detection, as a proxy for a person detector. It explicitly predicts two additional virtual keypoints that firmly describe the human body center, rotation and scale as a circle. Inspired by Leonardo’s Vitruvian man, we predict the midpoint of a person's hips, the radius of a circle circumscribing the whole person, and the incline angle of the line connecting the shoulder and hip midpoints.
| Fig 2. Vitruvian man aligned via two virtual keypoints predicted by BlazePose detector in addition to the face bounding box. |
Pose Landmark Model (BlazePose GHUM 3D)
The landmark model in MediaPipe Pose comes in two versions: a full-body model that predicts the location of 33 pose landmarks (see figure below), and an upper-body version that only predicts the first 25. The latter may be more accurate than the former in scenarios where the lower-body parts are mostly out of view.
Please find more detail in the BlazePose Google AI Blog, this paper and the model card, and the attributes in each landmark below.
| Fig 3. 33 pose landmarks. |
Solution APIs
Cross-platform Configuration Options
Naming style and availability may differ slightly across platforms/languages.
static_image_mode
If set to false, the solution treats the input images as a video stream. It
will try to detect the most prominent person in the very first images, and upon
a successful detection further localizes the pose landmarks. In subsequent
images, it then simply tracks those landmarks without invoking another detection
until it loses track, on reducing computation and latency. If set to true,
person detection runs every input image, ideal for processing a batch of static,
possibly unrelated, images. Default to false.
upper_body_only
If set to true, the solution outputs only the 25 upper-body pose landmarks.
Otherwise, it outputs the full set of 33 pose landmarks. Note that
upper-body-only prediction may be more accurate for use cases where the
lower-body parts are mostly out of view. Default to false.
smooth_landmarks
If set to true, the solution filters pose landmarks across different input
images to reduce jitter, but ignored if static_image_mode
is also set to true. Default to true.
min_detection_confidence
Minimum confidence value ([0.0, 1.0]) from the person-detection model for the
detection to be considered successful. Default to 0.5.
min_tracking_confidence
Minimum confidence value ([0.0, 1.0]) from the landmark-tracking model for the
pose landmarks to be considered tracked successfully, or otherwise person
detection will be invoked automatically on the next input image. Setting it to a
higher value can increase robustness of the solution, at the expense of a higher
latency. Ignored if static_image_mode is true, where
person detection simply runs on every image. Default to 0.5.
Output
Naming style may differ slightly across platforms/languages.
pose_landmarks
A list of pose landmarks. Each lanmark consists of the following:
-
xandy: Landmark coordinates normalized to[0.0, 1.0]by the image width and height respectively. -
z: Represents the landmark depth with the depth at the midpoint of hips being the origin, and the smaller the value the closer the landmark is to the camera. The magnitude ofzuses roughly the same scale asx.Note:
zis predicted only in full-body mode, and should be discarded when upper_body_only istrue. -
visibility: A value in[0.0, 1.0]indicating the likelihood of the landmark being visible (present and not occluded) in the image.
Python Solution API
Please first follow general instructions to install MediaPipe Python package, then learn more in the companion Python Colab and the following usage example.
Supported configuration options:
import cv2
import mediapipe as mp
mp_drawing = mp.solutions.drawing_utils
mp_pose = mp.solutions.pose

# For static images:
with mp_pose.Pose(
    static_image_mode=True, min_detection_confidence=0.5) as pose:
  for idx, file in enumerate(file_list):
    image = cv2.imread(file)
    image_height, image_width, _ = image.shape
    # Convert the BGR image to RGB before processing.
    results = pose.process(cv2.cvtColor(image, cv2.COLOR_BGR2RGB))

    if not results.pose_landmarks:
      continue
    print(
        f'Nose coordinates: ('
        f'{results.pose_landmarks.landmark[mp_holistic.PoseLandmark.NOSE].x * image_width}, '
        f'{results.pose_landmarks.landmark[mp_holistic.PoseLandmark.NOSE].y * image_height})'
    )
    # Draw pose landmarks on the image.
    annotated_image = image.copy()
    # Use mp_pose.UPPER_BODY_POSE_CONNECTIONS for drawing below when
    # upper_body_only is set to True.
    mp_drawing.draw_landmarks(
        annotated_image, results.pose_landmarks, mp_pose.POSE_CONNECTIONS)
    cv2.imwrite('/tmp/annotated_image' + str(idx) + '.png', annotated_image)

# For webcam input:
cap = cv2.VideoCapture(0)
with mp_pose.Pose(
    min_detection_confidence=0.5,
    min_tracking_confidence=0.5) as pose:
  while cap.isOpened():
    success, image = cap.read()
    if not success:
      print("Ignoring empty camera frame.")
      # If loading a video, use 'break' instead of 'continue'.
      continue

    # Flip the image horizontally for a later selfie-view display, and convert
    # the BGR image to RGB.
    image = cv2.cvtColor(cv2.flip(image, 1), cv2.COLOR_BGR2RGB)
    # To improve performance, optionally mark the image as not writeable to
    # pass by reference.
    image.flags.writeable = False
    results = pose.process(image)

    # Draw the pose annotation on the image.
    image.flags.writeable = True
    image = cv2.cvtColor(image, cv2.COLOR_RGB2BGR)
    mp_drawing.draw_landmarks(
        image, results.pose_landmarks, mp_pose.POSE_CONNECTIONS)
    cv2.imshow('MediaPipe Pose', image)
    if cv2.waitKey(5) & 0xFF == 27:
      break
cap.release()
JavaScript Solution API
Please first see general introduction on MediaPipe in JavaScript, then learn more in the companion web demo and the following usage example.
Supported configuration options:
<!DOCTYPE html>
<html>
<head>
  <meta charset="utf-8">
  <script src="https://cdn.jsdelivr.net/npm/@mediapipe/camera_utils/camera_utils.js" crossorigin="anonymous"></script>
  <script src="https://cdn.jsdelivr.net/npm/@mediapipe/control_utils/control_utils.js" crossorigin="anonymous"></script>
  <script src="https://cdn.jsdelivr.net/npm/@mediapipe/drawing_utils/drawing_utils.js" crossorigin="anonymous"></script>
  <script src="https://cdn.jsdelivr.net/npm/@mediapipe/pose/pose.js" crossorigin="anonymous"></script>
</head>

<body>
  <div class="container">
    <video class="input_video"></video>
    <canvas class="output_canvas" width="1280px" height="720px"></canvas>
  </div>
</body>
</html>
<script type="module">
const videoElement = document.getElementsByClassName('input_video')[0];
const canvasElement = document.getElementsByClassName('output_canvas')[0];
const canvasCtx = canvasElement.getContext('2d');

function onResults(results) {
  canvasCtx.save();
  canvasCtx.clearRect(0, 0, canvasElement.width, canvasElement.height);
  canvasCtx.drawImage(
      results.image, 0, 0, canvasElement.width, canvasElement.height);
  drawConnectors(canvasCtx, results.poseLandmarks, POSE_CONNECTIONS,
                 {color: '#00FF00', lineWidth: 4});
  drawLandmarks(canvasCtx, results.poseLandmarks,
                {color: '#FF0000', lineWidth: 2});
  canvasCtx.restore();
}

const pose = new Pose({locateFile: (file) => {
  return `https://cdn.jsdelivr.net/npm/@mediapipe/pose/${file}`;
}});
pose.setOptions({
  upperBodyOnly: false,
  smoothLandmarks: true,
  minDetectionConfidence: 0.5,
  minTrackingConfidence: 0.5
});
pose.onResults(onResults);

const camera = new Camera(videoElement, {
  onFrame: async () => {
    await pose.send({image: videoElement});
  },
  width: 1280,
  height: 720
});
camera.start();
</script>
Example Apps
Please first see general instructions for Android, iOS, and desktop on how to build MediaPipe examples.
Note: To visualize a graph, copy the graph and paste it into MediaPipe Visualizer. For more information on how to visualize its associated subgraphs, please see visualizer documentation.
Mobile
Main Example
- Graph:
mediapipe/graphs/pose_tracking/pose_tracking_gpu.pbtxt - Android target:
(or download prebuilt ARM64 APK)
mediapipe/examples/android/src/java/com/google/mediapipe/apps/posetrackinggpu:posetrackinggpu - iOS target:
mediapipe/examples/ios/posetrackinggpu:PoseTrackingGpuApp
Upper-body Only
- Graph:
mediapipe/graphs/pose_tracking/upper_body_pose_tracking_gpu.pbtxt - Android target:
(or download prebuilt ARM64 APK)
mediapipe/examples/android/src/java/com/google/mediapipe/apps/upperbodyposetrackinggpu:upperbodyposetrackinggpu - iOS target:
mediapipe/examples/ios/upperbodyposetrackinggpu:UpperBodyPoseTrackingGpuApp
Desktop
Please first see general instructions for desktop on how to build MediaPipe examples.
Main Example
- Running on CPU
- Running on GPU
Upper-body Only
- Running on CPU
- Running on GPU
Pose Classification and Repetition Counting
One of the applications BlazePose can enable is fitness. More specifically - pose classification and repetition counting. In this section we'll provide basic guidance on building a custom pose classifier with the help of a Colab and wrap it in a simple fitness app powered by ML Kit. Push-ups and squats are used for demonstration purposes as the most common exercises.
 |
|---|
| Fig 4. Pose classification and repetition counting with MediaPipe Pose. |
We picked the k-nearest neighbors algorithm (k-NN) as the classifier. It's simple and easy to start with. The algorithm determines the object's class based on the closest samples in the training set. To build it, one needs to:
- Collect image samples of the target exercises and run pose prediction on them,
- Convert obtained pose landmarks to a representation suitable for the k-NN classifier and form a training set,
- Perform the classification itself followed by repetition counting.
Training Set
To build a good classifier appropriate samples should be collected for the training set: about a few hundred samples for each terminal state of each exercise (e.g., "up" and "down" positions for push-ups). It's important that collected samples cover different camera angles, environment conditions, body shapes, and exercise variations.
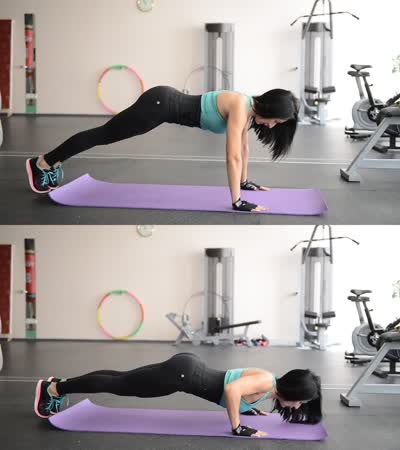 |
|---|
| Fig 5. Two terminal states of push-ups. |
To transform samples into a k-NN classifier training set, either basic or extended Colab could be used. They both use the Python Solution API to run the BlazePose models on given images and dump predicted pose landmarks to a CSV file. Additionally, the extended Colab provides useful tools to find outliers (e.g., wrongly predicted poses) and underrepresented classes (e.g., not covering all camera angles) by classifying each sample against the entire training set. After that, you'll be able to test the classifier on an arbitrary video right in the Colab.
Classification
Code of the classifier is available both in the extended Colab and in the ML Kit demo app. Please refer to them for details of the approach described below.
The k-NN algorithm used for pose classification requires a feature vector representation of each sample and a metric to compute the distance between two such vectors to find the nearest pose samples to a target one.
To convert pose landmarks to a feature vector, we use pairwise distances between predefined lists of pose joints, such as distances between wrist and shoulder, ankle and hip, and two wrists. Since the algorithm relies on distances, all poses are normalized to have the same torso size and vertical torso orientation before the conversion.
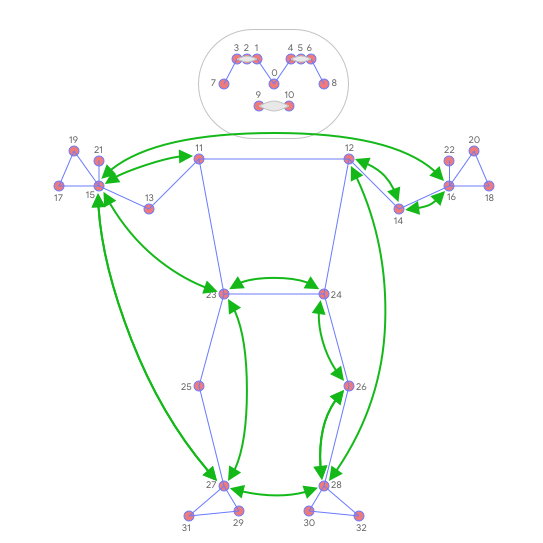 |
|---|
| Fig 6. Main pairwise distances used for the pose feature vector. |
To get a better classification result, k-NN search is invoked twice with different distance metrics:
- First, to filter out samples that are almost the same as the target one but have only a few different values in the feature vector (which means differently bent joints and thus other pose class), minimum per-coordinate distance is used as distance metric,
- Then average per-coordinate distance is used to find the nearest pose cluster among those from the first search.
Finally, we apply exponential moving average (EMA) smoothing to level any noise from pose prediction or classification. To do that, we search not only for the nearest pose cluster, but we calculate a probability for each of them and use it for smoothing over time.
Repetition Counter
To count the repetitions, the algorithm monitors the probability of a target pose class. Let's take push-ups with its "up" and "down" terminal states:
- When the probability of the "down" pose class passes a certain threshold for the first time, the algorithm marks that the "down" pose class is entered.
- Once the probability drops below the threshold, the algorithm marks that the "down" pose class has been exited and increases the counter.
To avoid cases when the probability fluctuates around the threshold (e.g., when the user pauses between "up" and "down" states) causing phantom counts, the threshold used to detect when the state is exited is actually slightly lower than the one used to detect when the state is entered. It creates an interval where the pose class and the counter can't be changed.
Future Work
We are actively working on improving BlazePose GHUM 3D's Z prediction. It will allow us to use joint angles in the feature vectors, which are more natural and easier to configure (although distances can still be useful to detect touches between body parts) and to perform rotation normalization of poses and reduce the number of camera angles required for accurate k-NN classification.