---
layout: default
title: Pose
parent: Solutions
has_children: true
has_toc: false
nav_order: 5
---
# MediaPipe Pose
{: .no_toc }
Table of contents
{: .text-delta }
1. TOC
{:toc}
---
## Overview
Human pose estimation from video plays a critical role in various applications
such as [quantifying physical exercises](./pose_classification.md), sign
language recognition, and full-body gesture control. For example, it can form
the basis for yoga, dance, and fitness applications. It can also enable the
overlay of digital content and information on top of the physical world in
augmented reality.
MediaPipe Pose is a ML solution for high-fidelity body pose tracking, inferring
33 3D landmarks and background segmentation mask on the whole body from RGB
video frames utilizing our
[BlazePose](https://ai.googleblog.com/2020/08/on-device-real-time-body-pose-tracking.html)
research that also powers the
[ML Kit Pose Detection API](https://developers.google.com/ml-kit/vision/pose-detection).
Current state-of-the-art approaches rely primarily on powerful desktop
environments for inference, whereas our method achieves real-time performance on
most modern [mobile phones](#mobile), [desktops/laptops](#desktop), in
[python](#python-solution-api) and even on the [web](#javascript-solution-api).
 |
:----------------------------------------------------------------------: |
*Fig 1. Example of MediaPipe Pose for pose tracking.* |
## ML Pipeline
The solution utilizes a two-step detector-tracker ML pipeline, proven to be
effective in our [MediaPipe Hands](./hands.md) and
[MediaPipe Face Mesh](./face_mesh.md) solutions. Using a detector, the pipeline
first locates the person/pose region-of-interest (ROI) within the frame. The
tracker subsequently predicts the pose landmarks and segmentation mask within
the ROI using the ROI-cropped frame as input. Note that for video use cases the
detector is invoked only as needed, i.e., for the very first frame and when the
tracker could no longer identify body pose presence in the previous frame. For
other frames the pipeline simply derives the ROI from the previous frame’s pose
landmarks.
The pipeline is implemented as a MediaPipe
[graph](https://github.com/google/mediapipe/tree/master/mediapipe/graphs/pose_tracking/pose_tracking_gpu.pbtxt)
that uses a
[pose landmark subgraph](https://github.com/google/mediapipe/tree/master/mediapipe/modules/pose_landmark/pose_landmark_gpu.pbtxt)
from the
[pose landmark module](https://github.com/google/mediapipe/tree/master/mediapipe/modules/pose_landmark)
and renders using a dedicated
[pose renderer subgraph](https://github.com/google/mediapipe/tree/master/mediapipe/graphs/pose_tracking/subgraphs/pose_renderer_gpu.pbtxt).
The
[pose landmark subgraph](https://github.com/google/mediapipe/tree/master/mediapipe/modules/pose_landmark/pose_landmark_gpu.pbtxt)
internally uses a
[pose detection subgraph](https://github.com/google/mediapipe/tree/master/mediapipe/modules/pose_detection/pose_detection_gpu.pbtxt)
from the
[pose detection module](https://github.com/google/mediapipe/tree/master/mediapipe/modules/pose_detection).
Note: To visualize a graph, copy the graph and paste it into
[MediaPipe Visualizer](https://viz.mediapipe.dev/). For more information on how
to visualize its associated subgraphs, please see
[visualizer documentation](../tools/visualizer.md).
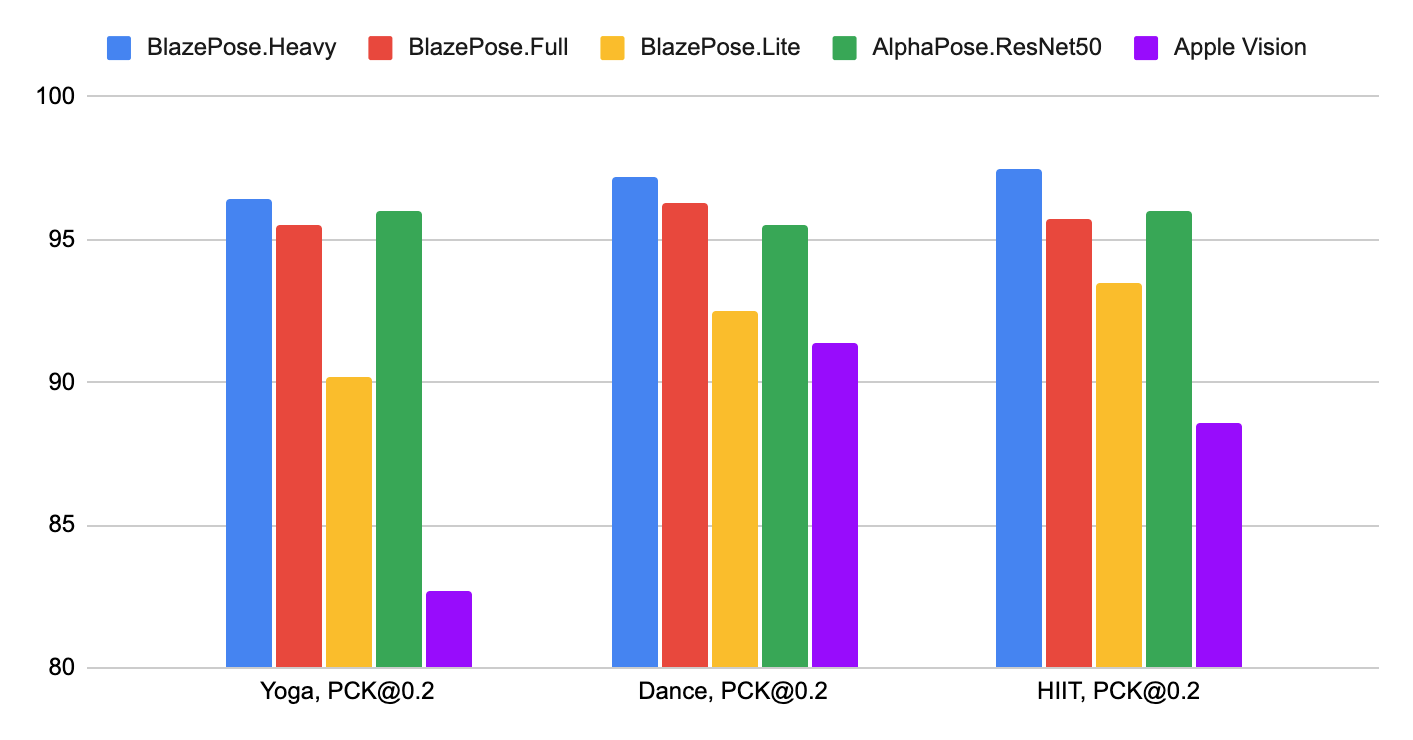
## Pose Estimation Quality
To evaluate the quality of our [models](./models.md#pose) against other
well-performing publicly available solutions, we use three different validation
datasets, representing different verticals: Yoga, Dance and HIIT. Each image
contains only a single person located 2-4 meters from the camera. To be
consistent with other solutions, we perform evaluation only for 17 keypoints
from [COCO topology](https://cocodataset.org/#keypoints-2020).
Method | Yoga [`mAP`] | Yoga [`PCK@0.2`] | Dance [`mAP`] | Dance [`PCK@0.2`] | HIIT [`mAP`] | HIIT [`PCK@0.2`]
----------------------------------------------------------------------------------------------------- | -----------------: | ---------------------: | ------------------: | ----------------------: | -----------------: | ---------------------:
BlazePose.Heavy | 68.1 | **96.4** | 73.0 | **97.2** | 74.0 | **97.5**
BlazePose.Full | 62.6 | **95.5** | 67.4 | **96.3** | 68.0 | **95.7**
BlazePose.Lite | 45.0 | **90.2** | 53.6 | **92.5** | 53.8 | **93.5**
[AlphaPose.ResNet50](https://github.com/MVIG-SJTU/AlphaPose) | 63.4 | **96.0** | 57.8 | **95.5** | 63.4 | **96.0**
[Apple.Vision](https://developer.apple.com/documentation/vision/detecting_human_body_poses_in_images) | 32.8 | **82.7** | 36.4 | **91.4** | 44.5 | **88.6**
 |
:--------------------------------------------------------------------------: |
*Fig 2. Quality evaluation in [`PCK@0.2`].* |
We designed our models specifically for live perception use cases, so all of
them work in real-time on the majority of modern devices.
Method | Latency Pixel 3 [TFLite GPU](https://www.tensorflow.org/lite/performance/gpu_advanced) | Latency MacBook Pro (15-inch 2017)
--------------- | -------------------------------------------------------------------------------------------: | ---------------------------------------:
BlazePose.Heavy | 53 ms | 38 ms
BlazePose.Full | 25 ms | 27 ms
BlazePose.Lite | 20 ms | 25 ms
## Models
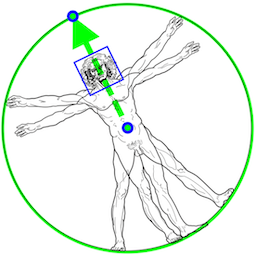
### Person/pose Detection Model (BlazePose Detector)
The detector is inspired by our own lightweight
[BlazeFace](https://arxiv.org/abs/1907.05047) model, used in
[MediaPipe Face Detection](./face_detection.md), as a proxy for a person
detector. It explicitly predicts two additional virtual keypoints that firmly
describe the human body center, rotation and scale as a circle. Inspired by
[Leonardo’s Vitruvian man](https://en.wikipedia.org/wiki/Vitruvian_Man), we
predict the midpoint of a person's hips, the radius of a circle circumscribing
the whole person, and the incline angle of the line connecting the shoulder and
hip midpoints.
 |
:----------------------------------------------------------------------------------------------------: |
*Fig 3. Vitruvian man aligned via two virtual keypoints predicted by BlazePose detector in addition to the face bounding box.* |
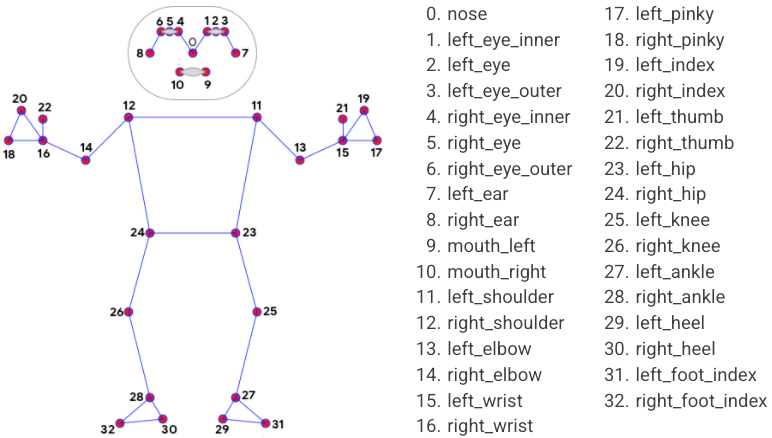
### Pose Landmark Model (BlazePose GHUM 3D)
The landmark model in MediaPipe Pose predicts the location of 33 pose landmarks
(see figure below).
 |
:----------------------------------------------------------------------------------------------: |
*Fig 4. 33 pose landmarks.* |
Optionally, MediaPipe Pose can predicts a full-body
[segmentation mask](#segmentation_mask) represented as a two-class segmentation
(human or background).
Please find more detail in the
[BlazePose Google AI Blog](https://ai.googleblog.com/2020/08/on-device-real-time-body-pose-tracking.html),
this [paper](https://arxiv.org/abs/2006.10204),
[the model card](./models.md#pose) and the [Output](#Output) section below.
## Solution APIs
### Cross-platform Configuration Options
Naming style and availability may differ slightly across platforms/languages.
#### static_image_mode
If set to `false`, the solution treats the input images as a video stream. It
will try to detect the most prominent person in the very first images, and upon
a successful detection further localizes the pose landmarks. In subsequent
images, it then simply tracks those landmarks without invoking another detection
until it loses track, on reducing computation and latency. If set to `true`,
person detection runs every input image, ideal for processing a batch of static,
possibly unrelated, images. Default to `false`.
#### model_complexity
Complexity of the pose landmark model: `0`, `1` or `2`. Landmark accuracy as
well as inference latency generally go up with the model complexity. Default to
`1`.
#### smooth_landmarks
If set to `true`, the solution filters pose landmarks across different input
images to reduce jitter, but ignored if [static_image_mode](#static_image_mode)
is also set to `true`. Default to `true`.
#### enable_segmentation
If set to `true`, in addition to the pose landmarks the solution also generates
the segmentation mask. Default to `false`.
#### smooth_segmentation
If set to `true`, the solution filters segmentation masks across different input
images to reduce jitter. Ignored if [enable_segmentation](#enable_segmentation)
is `false` or [static_image_mode](#static_image_mode) is `true`. Default to
`true`.
#### min_detection_confidence
Minimum confidence value (`[0.0, 1.0]`) from the person-detection model for the
detection to be considered successful. Default to `0.5`.
#### min_tracking_confidence
Minimum confidence value (`[0.0, 1.0]`) from the landmark-tracking model for the
pose landmarks to be considered tracked successfully, or otherwise person
detection will be invoked automatically on the next input image. Setting it to a
higher value can increase robustness of the solution, at the expense of a higher
latency. Ignored if [static_image_mode](#static_image_mode) is `true`, where
person detection simply runs on every image. Default to `0.5`.
### Output
Naming style may differ slightly across platforms/languages.
#### pose_landmarks
A list of pose landmarks. Each landmark consists of the following:
* `x` and `y`: Landmark coordinates normalized to `[0.0, 1.0]` by the image
width and height respectively.
* `z`: Represents the landmark depth with the depth at the midpoint of hips
being the origin, and the smaller the value the closer the landmark is to
the camera. The magnitude of `z` uses roughly the same scale as `x`.
* `visibility`: A value in `[0.0, 1.0]` indicating the likelihood of the
landmark being visible (present and not occluded) in the image.
#### pose_world_landmarks
*Fig 5. Example of MediaPipe Pose real-world 3D coordinates.* |
:-----------------------------------------------------------: |
|
Another list of pose landmarks in world coordinates. Each landmark consists of
the following:
* `x`, `y` and `z`: Real-world 3D coordinates in meters with the origin at the
center between hips.
* `visibility`: Identical to that defined in the corresponding
[pose_landmarks](#pose_landmarks).
#### segmentation_mask
The output segmentation mask, predicted only when
[enable_segmentation](#enable_segmentation) is set to `true`. The mask has the
same width and height as the input image, and contains values in `[0.0, 1.0]`
where `1.0` and `0.0` indicate high certainty of a "human" and "background"
pixel respectively. Please refer to the platform-specific usage examples below
for usage details.
*Fig 6. Example of MediaPipe Pose segmentation mask.* |
:-----------------------------------------------------------: |
|
### Python Solution API
Please first follow general [instructions](../getting_started/python.md) to
install MediaPipe Python package, then learn more in the companion
[Python Colab](#resources) and the usage example below.
Supported configuration options:
* [static_image_mode](#static_image_mode)
* [model_complexity](#model_complexity)
* [smooth_landmarks](#smooth_landmarks)
* [enable_segmentation](#enable_segmentation)
* [smooth_segmentation](#smooth_segmentation)
* [min_detection_confidence](#min_detection_confidence)
* [min_tracking_confidence](#min_tracking_confidence)
```python
import cv2
import mediapipe as mp
mp_drawing = mp.solutions.drawing_utils
mp_drawing_styles = mp.solutions.drawing_styles
mp_pose = mp.solutions.pose
# For static images:
IMAGE_FILES = []
BG_COLOR = (192, 192, 192) # gray
with mp_pose.Pose(
static_image_mode=True,
model_complexity=2,
enable_segmentation=True,
min_detection_confidence=0.5) as pose:
for idx, file in enumerate(IMAGE_FILES):
image = cv2.imread(file)
image_height, image_width, _ = image.shape
# Convert the BGR image to RGB before processing.
results = pose.process(cv2.cvtColor(image, cv2.COLOR_BGR2RGB))
if not results.pose_landmarks:
continue
print(
f'Nose coordinates: ('
f'{results.pose_landmarks.landmark[mp_holistic.PoseLandmark.NOSE].x * image_width}, '
f'{results.pose_landmarks.landmark[mp_holistic.PoseLandmark.NOSE].y * image_height})'
)
annotated_image = image.copy()
# Draw segmentation on the image.
# To improve segmentation around boundaries, consider applying a joint
# bilateral filter to "results.segmentation_mask" with "image".
condition = np.stack((results.segmentation_mask,) * 3, axis=-1) > 0.1
bg_image = np.zeros(image.shape, dtype=np.uint8)
bg_image[:] = BG_COLOR
annotated_image = np.where(condition, annotated_image, bg_image)
# Draw pose landmarks on the image.
mp_drawing.draw_landmarks(
annotated_image,
results.pose_landmarks,
mp_pose.POSE_CONNECTIONS,
landmark_drawing_spec=mp_drawing_styles.get_default_pose_landmarks_style())
cv2.imwrite('/tmp/annotated_image' + str(idx) + '.png', annotated_image)
# Plot pose world landmarks.
mp_drawing.plot_landmarks(
results.pose_world_landmarks, mp_pose.POSE_CONNECTIONS)
# For webcam input:
cap = cv2.VideoCapture(0)
with mp_pose.Pose(
min_detection_confidence=0.5,
min_tracking_confidence=0.5) as pose:
while cap.isOpened():
success, image = cap.read()
if not success:
print("Ignoring empty camera frame.")
# If loading a video, use 'break' instead of 'continue'.
continue
# Flip the image horizontally for a later selfie-view display, and convert
# the BGR image to RGB.
image = cv2.cvtColor(cv2.flip(image, 1), cv2.COLOR_BGR2RGB)
# To improve performance, optionally mark the image as not writeable to
# pass by reference.
image.flags.writeable = False
results = pose.process(image)
# Draw the pose annotation on the image.
image.flags.writeable = True
image = cv2.cvtColor(image, cv2.COLOR_RGB2BGR)
mp_drawing.draw_landmarks(
image,
results.pose_landmarks,
mp_pose.POSE_CONNECTIONS,
landmark_drawing_spec=mp_drawing_styles.get_default_pose_landmarks_style())
cv2.imshow('MediaPipe Pose', image)
if cv2.waitKey(5) & 0xFF == 27:
break
cap.release()
```
### JavaScript Solution API
Please first see general [introduction](../getting_started/javascript.md) on
MediaPipe in JavaScript, then learn more in the companion [web demo](#resources)
and the following usage example.
Supported configuration options:
* [modelComplexity](#model_complexity)
* [smoothLandmarks](#smooth_landmarks)
* [enableSegmentation](#enable_segmentation)
* [smoothSegmentation](#smooth_segmentation)
* [minDetectionConfidence](#min_detection_confidence)
* [minTrackingConfidence](#min_tracking_confidence)
```html
```
```javascript
```
## Example Apps
Please first see general instructions for
[Android](../getting_started/android.md), [iOS](../getting_started/ios.md), and
[desktop](../getting_started/cpp.md) on how to build MediaPipe examples.
Note: To visualize a graph, copy the graph and paste it into
[MediaPipe Visualizer](https://viz.mediapipe.dev/). For more information on how
to visualize its associated subgraphs, please see
[visualizer documentation](../tools/visualizer.md).
### Mobile
#### Main Example
* Graph:
[`mediapipe/graphs/pose_tracking/pose_tracking_gpu.pbtxt`](https://github.com/google/mediapipe/tree/master/mediapipe/graphs/pose_tracking/pose_tracking_gpu.pbtxt)
* Android target:
[(or download prebuilt ARM64 APK)](https://drive.google.com/file/d/17GFIrqEJS6W8UHKXlYevTtSCLxN9pWlY/view?usp=sharing)
[`mediapipe/examples/android/src/java/com/google/mediapipe/apps/posetrackinggpu:posetrackinggpu`](https://github.com/google/mediapipe/tree/master/mediapipe/examples/android/src/java/com/google/mediapipe/apps/posetrackinggpu/BUILD)
* iOS target:
[`mediapipe/examples/ios/posetrackinggpu:PoseTrackingGpuApp`](http:/mediapipe/examples/ios/posetrackinggpu/BUILD)
### Desktop
Please first see general instructions for [desktop](../getting_started/cpp.md)
on how to build MediaPipe examples.
#### Main Example
* Running on CPU
* Graph:
[`mediapipe/graphs/pose_tracking/pose_tracking_cpu.pbtxt`](https://github.com/google/mediapipe/tree/master/mediapipe/graphs/pose_tracking/pose_tracking_cpu.pbtxt)
* Target:
[`mediapipe/examples/desktop/pose_tracking:pose_tracking_cpu`](https://github.com/google/mediapipe/tree/master/mediapipe/examples/desktop/pose_tracking/BUILD)
* Running on GPU
* Graph:
[`mediapipe/graphs/pose_tracking/pose_tracking_gpu.pbtxt`](https://github.com/google/mediapipe/tree/master/mediapipe/graphs/pose_tracking/pose_tracking_gpu.pbtxt)
* Target:
[`mediapipe/examples/desktop/pose_tracking:pose_tracking_gpu`](https://github.com/google/mediapipe/tree/master/mediapipe/examples/desktop/pose_tracking/BUILD)
## Resources
* Google AI Blog:
[BlazePose - On-device Real-time Body Pose Tracking](https://ai.googleblog.com/2020/08/on-device-real-time-body-pose-tracking.html)
* Paper:
[BlazePose: On-device Real-time Body Pose Tracking](https://arxiv.org/abs/2006.10204)
([presentation](https://youtu.be/YPpUOTRn5tA))
* [Models and model cards](./models.md#pose)
* [Web demo](https://code.mediapipe.dev/codepen/pose)
* [Python Colab](https://mediapipe.page.link/pose_py_colab)
[`mAP`]: https://cocodataset.org/#keypoints-eval
[`PCK@0.2`]: https://github.com/cbsudux/Human-Pose-Estimation-101