---
layout: default
title: Face Mesh
parent: Solutions
nav_order: 2
---
# MediaPipe Face Mesh
{: .no_toc }
Table of contents
{: .text-delta }
1. TOC
{:toc}
---
## Overview
MediaPipe Face Mesh is a face geometry solution that estimates 468 3D face
landmarks in real-time even on mobile devices. It employs machine learning (ML)
to infer the 3D surface geometry, requiring only a single camera input without
the need for a dedicated depth sensor. Utilizing lightweight model architectures
together with GPU acceleration throughout the pipeline, the solution delivers
real-time performance critical for live experiences.
Additionally, the solution is bundled with the Face Geometry module that bridges
the gap between the face landmark estimation and useful real-time augmented
reality (AR) applications. It establishes a metric 3D space and uses the face
landmark screen positions to estimate face geometry within that space. The face
geometry data consists of common 3D geometry primitives, including a face pose
transformation matrix and a triangular face mesh. Under the hood, a lightweight
statistical analysis method called
[Procrustes Analysis](https://en.wikipedia.org/wiki/Procrustes_analysis) is
employed to drive a robust, performant and portable logic. The analysis runs on
CPU and has a minimal speed/memory footprint on top of the ML model inference.
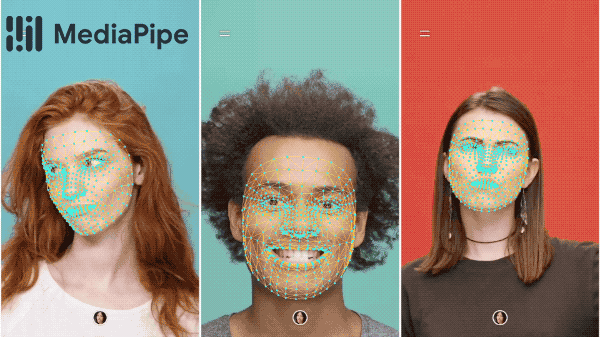 |
:-------------------------------------------------------------: |
*Fig 1. AR effects utilizing facial surface geometry.* |
## ML Pipeline
Our ML pipeline consists of two real-time deep neural network models that work
together: A detector that operates on the full image and computes face locations
and a 3D face landmark model that operates on those locations and predicts the
approximate surface geometry via regression. Having the face accurately cropped
drastically reduces the need for common data augmentations like affine
transformations consisting of rotations, translation and scale changes. Instead
it allows the network to dedicate most of its capacity towards coordinate
prediction accuracy. In addition, in our pipeline the crops can also be
generated based on the face landmarks identified in the previous frame, and only
when the landmark model could no longer identify face presence is the face
detector invoked to relocalize the face. This strategy is similar to that
employed in our [MediaPipe Hands](./hands.md) solution, which uses a palm detector
together with a hand landmark model.
The pipeline is implemented as a MediaPipe
[graph](https://github.com/google/mediapipe/tree/master/mediapipe/graphs/face_mesh/face_mesh_mobile.pbtxt)
that uses a
[face landmark subgraph](https://github.com/google/mediapipe/tree/master/mediapipe/modules/face_landmark/face_landmark_front_gpu.pbtxt)
from the
[face landmark module](https://github.com/google/mediapipe/tree/master/mediapipe/modules/face_landmark),
and renders using a dedicated
[face renderer subgraph](https://github.com/google/mediapipe/tree/master/mediapipe/graphs/face_mesh/subgraphs/face_renderer_gpu.pbtxt).
The
[face landmark subgraph](https://github.com/google/mediapipe/tree/master/mediapipe/modules/face_landmark/face_landmark_front_gpu.pbtxt)
internally uses a
[face_detection_subgraph](https://github.com/google/mediapipe/tree/master/mediapipe/modules/face_detection/face_detection_front_gpu.pbtxt)
from the
[face detection module](https://github.com/google/mediapipe/tree/master/mediapipe/modules/face_detection).
Note: To visualize a graph, copy the graph and paste it into
[MediaPipe Visualizer](https://viz.mediapipe.dev/). For more information on how
to visualize its associated subgraphs, please see
[visualizer documentation](../tools/visualizer.md).
### Models
#### Face Detection Model
The face detector is the same [BlazeFace](https://arxiv.org/abs/1907.05047)
model used in [MediaPipe Face Detection](./face_detection.md). Please refer to
[MediaPipe Face Detection](./face_detection.md) for details.
#### Face Landmark Model
For 3D face landmarks we employed transfer learning and trained a network with
several objectives: the network simultaneously predicts 3D landmark coordinates
on synthetic rendered data and 2D semantic contours on annotated real-world
data. The resulting network provided us with reasonable 3D landmark predictions
not just on synthetic but also on real-world data.
The 3D landmark network receives as input a cropped video frame without
additional depth input. The model outputs the positions of the 3D points, as
well as the probability of a face being present and reasonably aligned in the
input. A common alternative approach is to predict a 2D heatmap for each
landmark, but it is not amenable to depth prediction and has high computational
costs for so many points. We further improve the accuracy and robustness of our
model by iteratively bootstrapping and refining predictions. That way we can
grow our dataset to increasingly challenging cases, such as grimaces, oblique
angle and occlusions.
You can find more information about the face landmark model in this
[paper](https://arxiv.org/abs/1907.06724).
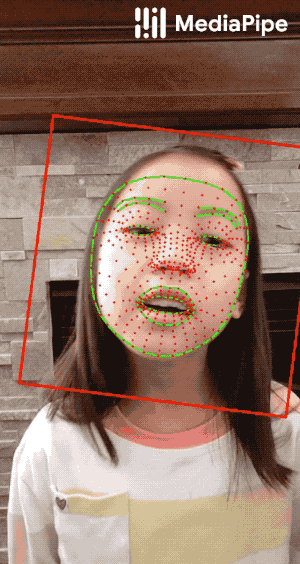 |
:------------------------------------------------------------------------: |
*Fig 2. Face landmarks: the red box indicates the cropped area as input to the landmark model, the red dots represent the 468 landmarks in 3D, and the green lines connecting landmarks illustrate the contours around the eyes, eyebrows, lips and the entire face.* |
## Face Geometry Module
The [Face Landmark Model](#face-landmark-model) performs a single-camera face landmark
detection in the screen coordinate space: the X- and Y- coordinates are
normalized screen coordinates, while the Z coordinate is relative and is scaled
as the X coodinate under the
[weak perspective projection camera model](https://en.wikipedia.org/wiki/3D_projection#Weak_perspective_projection).
This format is well-suited for some applications, however it does not directly
enable the full spectrum of augmented reality (AR) features like aligning a
virtual 3D object with a detected face.
The
[Face Geometry module](https://github.com/google/mediapipe/tree/master/mediapipe/modules/face_geometry)
moves away from the screen coordinate space towards a metric 3D space and
provides necessary primitives to handle a detected face as a regular 3D object.
By design, you'll be able to use a perspective camera to project the final 3D
scene back into the screen coordinate space with a guarantee that the face
landmark positions are not changed.
### Key Concepts
#### Metric 3D Space
The **Metric 3D space** established within the Face Geometry module is a
right-handed orthonormal metric 3D coordinate space. Within the space, there is
a **virtual perspective camera** located at the space origin and pointed in the
negative direction of the Z-axis. In the current pipeline, it is assumed that
the input camera frames are observed by exactly this virtual camera and
therefore its parameters are later used to convert the screen landmark
coordinates back into the Metric 3D space. The *virtual camera parameters* can
be set freely, however for better results it is advised to set them as close to
the *real physical camera parameters* as possible.
 |
:----------------------------------------------------------------------------: |
*Fig 3. A visualization of multiple key elements in the Metric 3D space.* |
#### Canonical Face Model
The **Canonical Face Model** is a static 3D model of a human face, which follows
the 468 3D face landmark topology of the
[Face Landmark Model](#face-landmark-model). The model bears two important
functions:
- **Defines metric units**: the scale of the canonical face model defines the
metric units of the Metric 3D space. A metric unit used by the
[default canonical face model](https://github.com/google/mediapipe/tree/master/mediapipe/modules/face_geometry/data/canonical_face_model.fbx)
is a centimeter;
- **Bridges static and runtime spaces**: the face pose transformation matrix
is - in fact - a linear map from the canonical face model into the runtime
face landmark set estimated on each frame. This way, virtual 3D assets
modeled around the canonical face model can be aligned with a tracked face
by applying the face pose transformation matrix to them.
### Components
#### Geometry Pipeline
The **Geometry Pipeline** is a key component, which is responsible for
estimating face geometry objects within the Metric 3D space. On each frame, the
following steps are executed in the given order:
- Face landmark screen coordinates are converted into the Metric 3D space
coordinates;
- Face pose transformation matrix is estimated as a rigid linear mapping from
the canonical face metric landmark set into the runtime face metric landmark
set in a way that minimizes a difference between the two;
- A face mesh is created using the runtime face metric landmarks as the vertex
positions (XYZ), while both the vertex texture coordinates (UV) and the
triangular topology are inherited from the canonical face model.
The geometry pipeline is implemented as a MediaPipe
[calculator](https://github.com/google/mediapipe/tree/master/mediapipe/modules/face_geometry/geometry_pipeline_calculator.cc).
For your convenience, the face geometry pipeline calculator is bundled together
with the face landmark module into a unified MediaPipe
[subgraph](https://github.com/google/mediapipe/tree/master/mediapipe/modules/face_geometry/face_geometry_front_gpu.pbtxt).
The face geometry format is defined as a Protocol Buffer
[message](https://github.com/google/mediapipe/tree/master/mediapipe/modules/face_geometry/protos/face_geometry.proto).
#### Effect Renderer
The **Effect Renderer** is a component, which serves as a working example of a
face effect renderer. It targets the *OpenGL ES 2.0* API to enable a real-time
performance on mobile devices and supports the following rendering modes:
- **3D object rendering mode**: a virtual object is aligned with a detected
face to emulate an object attached to the face (example: glasses);
- **Face mesh rendering mode**: a texture is stretched on top of the face mesh
surface to emulate a face painting technique.
In both rendering modes, the face mesh is first rendered as an occluder straight
into the depth buffer. This step helps to create a more believable effect via
hiding invisible elements behind the face surface.
The effect renderer is implemented as a MediaPipe
[calculator](https://github.com/google/mediapipe/tree/master/mediapipe/modules/face_geometry/effect_renderer_calculator.cc).
|  |
| :---------------------------------------------------------------------: |
| *Fig 4. An example of face effects rendered by the Face Geometry Effect Renderer.* |
## Solution APIs
### Configuration Options
Naming style and availability may differ slightly across platforms/languages.
#### static_image_mode
If set to `false`, the solution treats the input images as a video stream. It
will try to detect faces in the first input images, and upon a successful
detection further localizes the face landmarks. In subsequent images, once all
[max_num_faces](#max_num_faces) faces are detected and the corresponding face
landmarks are localized, it simply tracks those landmarks without invoking
another detection until it loses track of any of the faces. This reduces latency
and is ideal for processing video frames. If set to `true`, face detection runs
on every input image, ideal for processing a batch of static, possibly
unrelated, images. Default to `false`.
#### max_num_faces
Maximum number of faces to detect. Default to `1`.
#### min_detection_confidence
Minimum confidence value (`[0.0, 1.0]`) from the face detection model for the
detection to be considered successful. Default to `0.5`.
#### min_tracking_confidence
Minimum confidence value (`[0.0, 1.0]`) from the landmark-tracking model for the
face landmarks to be considered tracked successfully, or otherwise face
detection will be invoked automatically on the next input image. Setting it to a
higher value can increase robustness of the solution, at the expense of a higher
latency. Ignored if [static_image_mode](#static_image_mode) is `true`, where
face detection simply runs on every image. Default to `0.5`.
### Output
Naming style may differ slightly across platforms/languages.
#### multi_face_landmarks
Collection of detected/tracked faces, where each face is represented as a list
of 468 face landmarks and each landmark is composed of `x`, `y` and `z`. `x` and
`y` are normalized to `[0.0, 1.0]` by the image width and height respectively.
`z` represents the landmark depth with the depth at center of the head being the
origin, and the smaller the value the closer the landmark is to the camera. The
magnitude of `z` uses roughly the same scale as `x`.
### Python Solution API
Please first follow general [instructions](../getting_started/python.md) to
install MediaPipe Python package, then learn more in the companion [Colab] and
the following usage example.
Supported configuration options:
* [static_image_mode](#static_image_mode)
* [max_num_faces](#max_num_faces)
* [min_detection_confidence](#min_detection_confidence)
* [min_tracking_confidence](#min_tracking_confidence)
```python
import cv2
import mediapipe as mp
mp_drawing = mp.solutions.drawing_utils
mp_face_mesh = mp.solutions.face_mesh
# For static images:
face_mesh = mp_face_mesh.FaceMesh(
static_image_mode=True,
max_num_faces=1,
min_detection_confidence=0.5)
drawing_spec = mp_drawing.DrawingSpec(thickness=1, circle_radius=1)
for idx, file in enumerate(file_list):
image = cv2.imread(file)
# Convert the BGR image to RGB before processing.
results = face_mesh.process(cv2.cvtColor(image, cv2.COLOR_BGR2RGB))
# Print and draw face mesh landmarks on the image.
if not results.multi_face_landmarks:
continue
annotated_image = image.copy()
for face_landmarks in results.multi_face_landmarks:
print('face_landmarks:', face_landmarks)
mp_drawing.draw_landmarks(
image=annotated_image,
landmark_list=face_landmarks,
connections=mp_face_mesh.FACE_CONNECTIONS,
landmark_drawing_spec=drawing_spec,
connection_drawing_spec=drawing_spec)
cv2.imwrite('/tmp/annotated_image' + str(idx) + '.png', annotated_image)
face_mesh.close()
# For webcam input:
face_mesh = mp_face_mesh.FaceMesh(
min_detection_confidence=0.5, min_tracking_confidence=0.5)
drawing_spec = mp_drawing.DrawingSpec(thickness=1, circle_radius=1)
cap = cv2.VideoCapture(0)
while cap.isOpened():
success, image = cap.read()
if not success:
print("Ignoring empty camera frame.")
# If loading a video, use 'break' instead of 'continue'.
continue
# Flip the image horizontally for a later selfie-view display, and convert
# the BGR image to RGB.
image = cv2.cvtColor(cv2.flip(image, 1), cv2.COLOR_BGR2RGB)
# To improve performance, optionally mark the image as not writeable to
# pass by reference.
image.flags.writeable = False
results = face_mesh.process(image)
# Draw the face mesh annotations on the image.
image.flags.writeable = True
image = cv2.cvtColor(image, cv2.COLOR_RGB2BGR)
if results.multi_face_landmarks:
for face_landmarks in results.multi_face_landmarks:
mp_drawing.draw_landmarks(
image=image,
landmark_list=face_landmarks,
connections=mp_face_mesh.FACE_CONNECTIONS,
landmark_drawing_spec=drawing_spec,
connection_drawing_spec=drawing_spec)
cv2.imshow('MediaPipe FaceMesh', image)
if cv2.waitKey(5) & 0xFF == 27:
break
face_mesh.close()
cap.release()
```
### JavaScript Solution API
Please first see general [introduction](../getting_started/javascript.md) on
MediaPipe in JavaScript, then learn more in the companion [web demo] and the
following usage example.
Supported configuration options:
* [maxNumFaces](#max_num_faces)
* [minDetectionConfidence](#min_detection_confidence)
* [minTrackingConfidence](#min_tracking_confidence)
```html
```
```javascript
```
## Example Apps
Please first see general instructions for
[Android](../getting_started/android.md), [iOS](../getting_started/ios.md) and
[desktop](../getting_started/cpp.md) on how to build MediaPipe examples.
Note: To visualize a graph, copy the graph and paste it into
[MediaPipe Visualizer](https://viz.mediapipe.dev/). For more information on how
to visualize its associated subgraphs, please see
[visualizer documentation](../tools/visualizer.md).
### Face Landmark Example
Face landmark example showcases real-time, cross-platform face landmark
detection. For visual reference, please refer to *Fig. 2*.
#### Mobile
* Graph:
[`mediapipe/graphs/face_mesh/face_mesh_mobile.pbtxt`](https://github.com/google/mediapipe/tree/master/mediapipe/graphs/face_mesh/face_mesh_mobile.pbtxt)
* Android target:
[(or download prebuilt ARM64 APK)](https://drive.google.com/open?id=1pUmd7CXCL_onYMbsZo5p91cH0oNnR4gi)
[`mediapipe/examples/android/src/java/com/google/mediapipe/apps/facemeshgpu:facemeshgpu`](https://github.com/google/mediapipe/tree/master/mediapipe/examples/android/src/java/com/google/mediapipe/apps/facemeshgpu/BUILD)
* iOS target:
[`mediapipe/examples/ios/facemeshgpu:FaceMeshGpuApp`](http:/mediapipe/examples/ios/facemeshgpu/BUILD)
Tip: Maximum number of faces to detect/process is set to 1 by default. To change
it, for Android modify `NUM_FACES` in
[MainActivity.java](https://github.com/google/mediapipe/tree/master/mediapipe/examples/android/src/java/com/google/mediapipe/apps/facemeshgpu/MainActivity.java),
and for iOS modify `kNumFaces` in
[FaceMeshGpuViewController.mm](https://github.com/google/mediapipe/tree/master/mediapipe/examples/ios/facemeshgpu/FaceMeshGpuViewController.mm).
#### Desktop
* Running on CPU
* Graph:
[`mediapipe/graphs/face_mesh/face_mesh_desktop_live.pbtxt`](https://github.com/google/mediapipe/tree/master/mediapipe/graphs/face_mesh/face_mesh_desktop_live.pbtxt)
* Target:
[`mediapipe/examples/desktop/face_mesh:face_mesh_cpu`](https://github.com/google/mediapipe/tree/master/mediapipe/examples/desktop/face_mesh/BUILD)
* Running on GPU
* Graph:
[`mediapipe/graphs/face_mesh/face_mesh_desktop_live_gpu.pbtxt`](https://github.com/google/mediapipe/tree/master/mediapipe/graphs/face_mesh/face_mesh_desktop_live_gpu.pbtxt)
* Target:
[`mediapipe/examples/desktop/face_mesh:face_mesh_gpu`](https://github.com/google/mediapipe/tree/master/mediapipe/examples/desktop/face_mesh/BUILD)
Tip: Maximum number of faces to detect/process is set to 1 by default. To change
it, in the graph file modify the option of `ConstantSidePacketCalculator`.
### Face Effect Example
Face effect example showcases real-time mobile face effect application use case
for the Face Mesh solution. To enable a better user experience, this example
only works for a single face. For visual reference, please refer to *Fig. 4*.
#### Mobile
* Graph:
[`mediapipe/graphs/face_effect/face_effect_gpu.pbtxt`](https://github.com/google/mediapipe/tree/master/mediapipe/graphs/face_effect/face_effect_gpu.pbtxt)
* Android target:
[(or download prebuilt ARM64 APK)](https://drive.google.com/file/d/1ccnaDnffEuIXriBZr2SK_Eu4FpO7K44s)
[`mediapipe/examples/android/src/java/com/google/mediapipe/apps/faceeffect`](https://github.com/google/mediapipe/tree/master/mediapipe/examples/android/src/java/com/google/mediapipe/apps/faceeffect/BUILD)
* iOS target:
[`mediapipe/examples/ios/faceeffect`](http:/mediapipe/examples/ios/faceeffect/BUILD)
## Resources
* Google AI Blog:
[Real-Time AR Self-Expression with Machine Learning](https://ai.googleblog.com/2019/03/real-time-ar-self-expression-with.html)
* TensorFlow Blog:
[Face and hand tracking in the browser with MediaPipe and TensorFlow.js](https://blog.tensorflow.org/2020/03/face-and-hand-tracking-in-browser-with-mediapipe-and-tensorflowjs.html)
* Google Developers Blog:
[MediaPipe 3D Face Transform](https://developers.googleblog.com/2020/09/mediapipe-3d-face-transform.html)
* Paper:
[Real-time Facial Surface Geometry from Monocular Video on Mobile GPUs](https://arxiv.org/abs/1907.06724)
([poster](https://docs.google.com/presentation/d/1-LWwOMO9TzEVdrZ1CS1ndJzciRHfYDJfbSxH_ke_JRg/present?slide=id.g5986dd4b4c_4_212))
* Canonical face model:
[FBX](https://github.com/google/mediapipe/tree/master/mediapipe/modules/face_geometry/data/canonical_face_model.fbx),
[OBJ](https://github.com/google/mediapipe/tree/master/mediapipe/modules/face_geometry/data/canonical_face_model.obj),
[UV visualization](https://github.com/google/mediapipe/tree/master/mediapipe/modules/face_geometry/data/canonical_face_model_uv_visualization.png)
* [Models and model cards](./models.md#face_mesh)
[Colab]:https://mediapipe.page.link/face_mesh_py_colab
[web demo]:https://code.mediapipe.dev/codepen/face_mesh