2020-06-06 01:49:27 +02:00
|
|
|
---
|
2023-04-04 00:12:06 +02:00
|
|
|
layout: forward
|
|
|
|
|
target: https://developers.google.com/mediapipe/solutions/guide#legacy
|
2020-06-06 01:49:27 +02:00
|
|
|
title: AutoFlip (Saliency-aware Video Cropping)
|
2023-04-04 02:41:28 +02:00
|
|
|
parent: MediaPipe Legacy Solutions
|
2021-06-03 22:13:30 +02:00
|
|
|
nav_order: 14
|
2020-06-06 01:49:27 +02:00
|
|
|
---
|
|
|
|
|
|
|
|
|
|
# AutoFlip: Saliency-aware Video Cropping
|
|
|
|
|
{: .no_toc }
|
|
|
|
|
|
2020-12-10 04:13:05 +01:00
|
|
|
<details close markdown="block">
|
|
|
|
|
<summary>
|
|
|
|
|
Table of contents
|
|
|
|
|
</summary>
|
|
|
|
|
{: .text-delta }
|
2020-06-06 01:49:27 +02:00
|
|
|
1. TOC
|
|
|
|
|
{:toc}
|
2020-12-10 04:13:05 +01:00
|
|
|
</details>
|
2020-06-06 01:49:27 +02:00
|
|
|
---
|
|
|
|
|
|
2023-03-01 18:19:12 +01:00
|
|
|
**Attention:** *Thank you for your interest in MediaPipe Solutions.
|
|
|
|
|
We have ended support for this MediaPipe Legacy Solution as of March 1, 2023.
|
2023-04-04 00:12:06 +02:00
|
|
|
For more information, see the
|
2023-03-01 18:19:12 +01:00
|
|
|
[MediaPipe Solutions](https://developers.google.com/mediapipe/solutions/guide#legacy)
|
|
|
|
|
site.*
|
|
|
|
|
|
|
|
|
|
----
|
|
|
|
|
|
2020-06-06 01:49:27 +02:00
|
|
|
## Overview
|
|
|
|
|
|
|
|
|
|
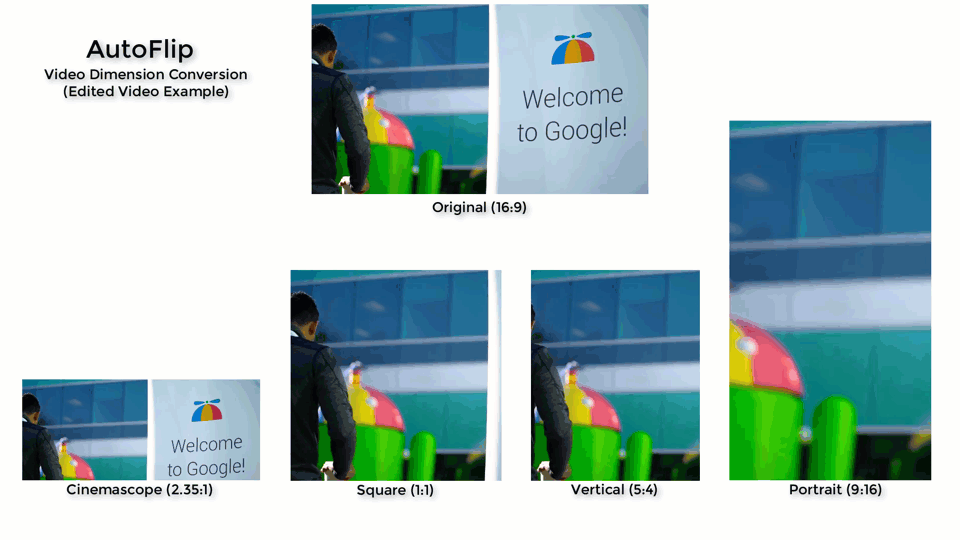
AutoFlip is an automatic video cropping pipeline built on top of MediaPipe. This
|
|
|
|
|
example focuses on demonstrating how to use AutoFlip to convert an input video
|
|
|
|
|
to arbitrary aspect ratios.
|
|
|
|
|
|
|
|
|
|
For overall context on AutoFlip, please read this
|
|
|
|
|
[Google AI Blog](https://ai.googleblog.com/2020/02/autoflip-open-source-framework-for.html).
|
|
|
|
|
|
2022-09-06 23:29:51 +02:00
|
|
|
|
2020-06-06 01:49:27 +02:00
|
|
|
|
|
|
|
|
## Building
|
|
|
|
|
|
|
|
|
|
Run the following command to build the AutoFlip pipeline:
|
|
|
|
|
|
|
|
|
|
Note: AutoFlip currently only works with OpenCV 3. Please verify your OpenCV
|
|
|
|
|
version beforehand.
|
|
|
|
|
|
|
|
|
|
```bash
|
|
|
|
|
bazel build -c opt --define MEDIAPIPE_DISABLE_GPU=1 mediapipe/examples/desktop/autoflip:run_autoflip
|
|
|
|
|
```
|
|
|
|
|
|
|
|
|
|
## Running
|
|
|
|
|
|
|
|
|
|
```bash
|
|
|
|
|
GLOG_logtostderr=1 bazel-bin/mediapipe/examples/desktop/autoflip/run_autoflip \
|
|
|
|
|
--calculator_graph_config_file=mediapipe/examples/desktop/autoflip/autoflip_graph.pbtxt \
|
|
|
|
|
--input_side_packets=input_video_path=/absolute/path/to/the/local/video/file,output_video_path=/absolute/path/to/save/the/output/video/file,aspect_ratio=1:1
|
|
|
|
|
```
|
|
|
|
|
|
|
|
|
|
Use the `aspect_ratio` flag to provide the output aspect ratio. The format
|
|
|
|
|
should be `width:height`, where the `width` and `height` are two positive
|
|
|
|
|
integers. AutoFlip supports both landscape-to-portrait and portrait-to-landscape
|
|
|
|
|
conversions. The pipeline internally compares the target aspect ratio against
|
|
|
|
|
the original one, and determines the correct conversion automatically.
|
|
|
|
|
|
|
|
|
|
We have put a couple test videos under this
|
|
|
|
|
[Google Drive folder](https://drive.google.com/corp/drive/u/0/folders/1KK9LV--Ey0UEVpxssVLhVl7dypgJSQgk).
|
|
|
|
|
You could download the videos into your local file system, then modify the
|
|
|
|
|
command above accordingly to run AutoFlip against the videos.
|
|
|
|
|
|
|
|
|
|
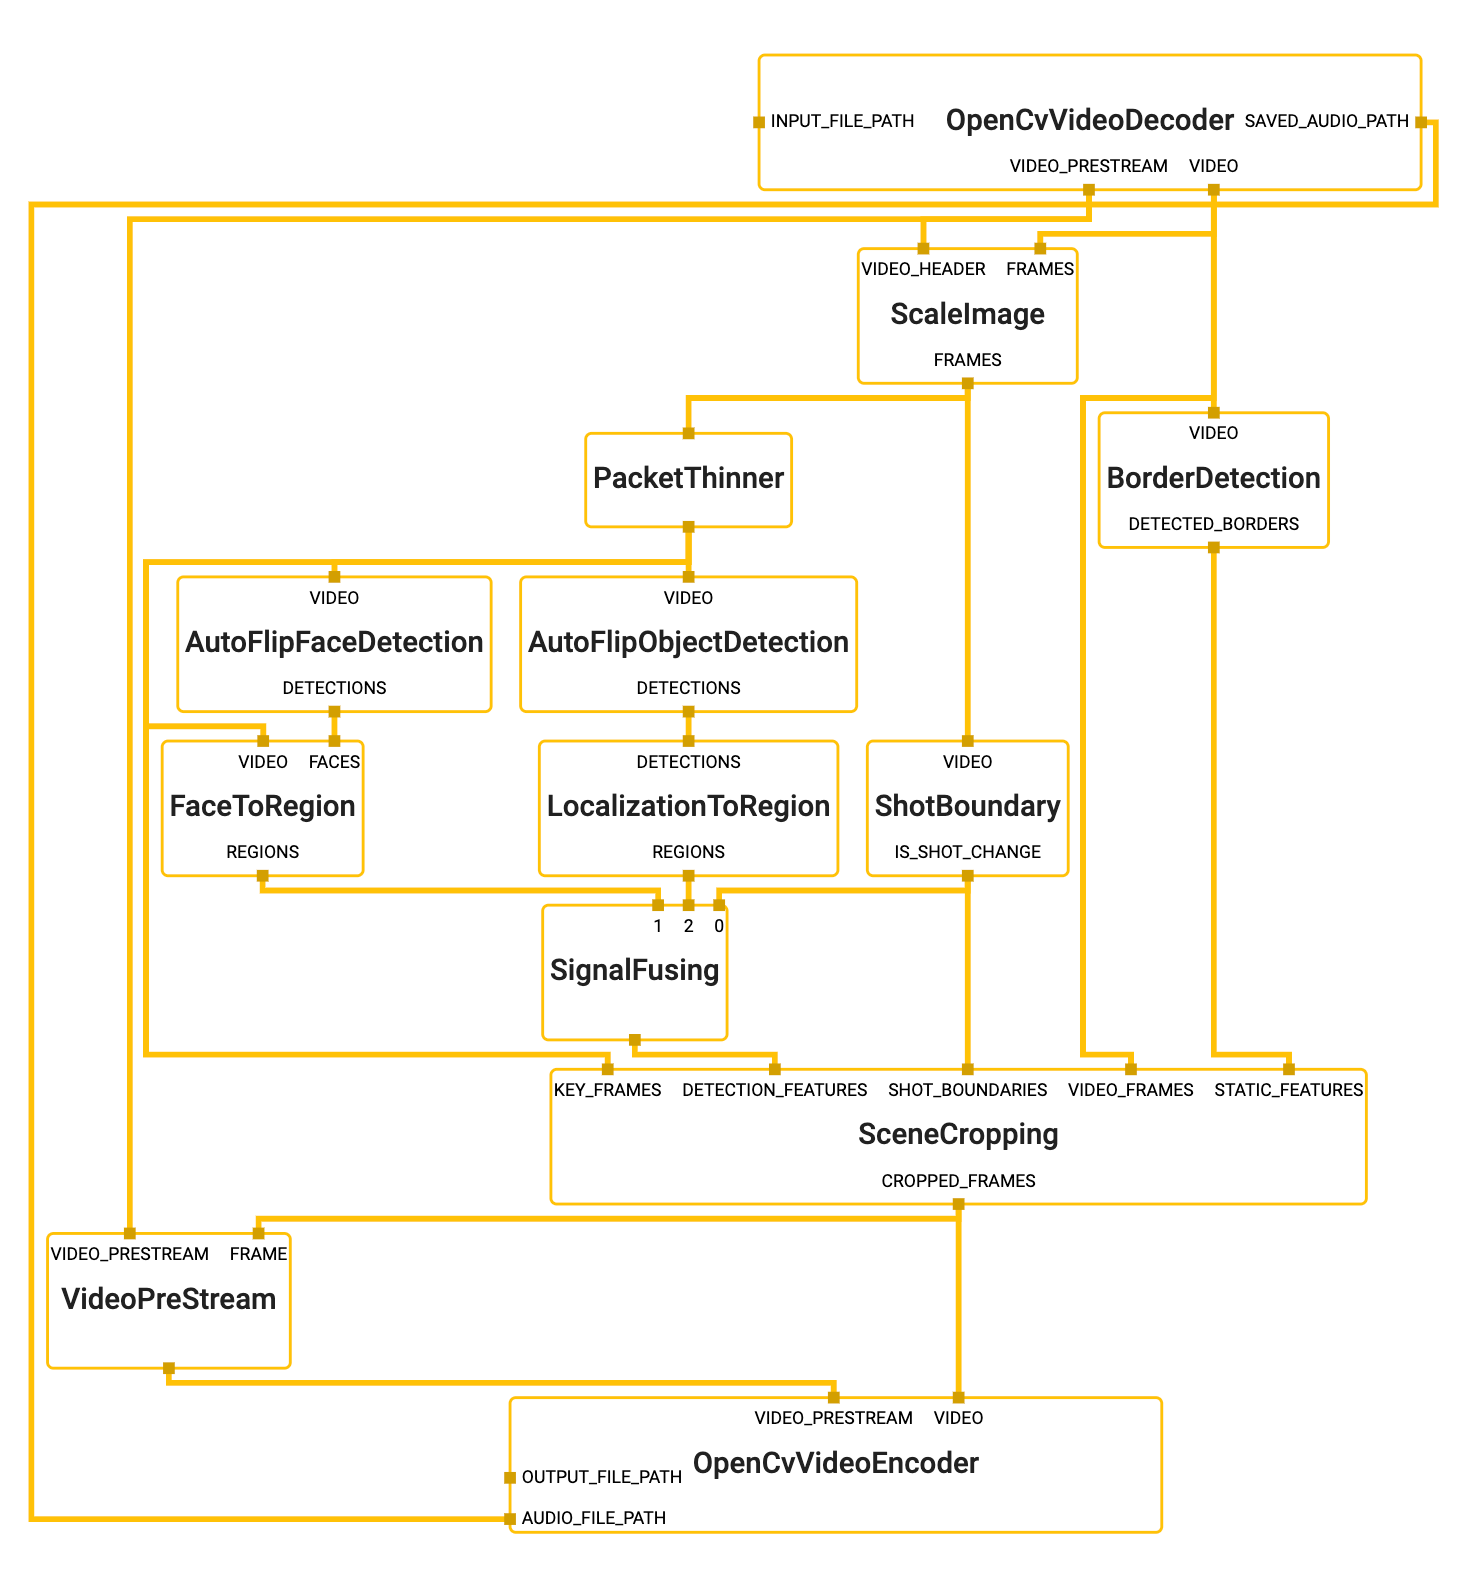
## MediaPipe Graph
|
|
|
|
|
|
2022-09-06 23:29:51 +02:00
|
|
|
|
2020-06-06 01:49:27 +02:00
|
|
|
|
|
|
|
|
To visualize the graph as shown above, copy the text specification of the graph
|
|
|
|
|
below and paste it into [MediaPipe Visualizer](https://viz.mediapipe.dev).
|
|
|
|
|
|
|
|
|
|
```bash
|
|
|
|
|
# Autoflip graph that only renders the final cropped video. For use with
|
|
|
|
|
# end user applications.
|
|
|
|
|
max_queue_size: -1
|
|
|
|
|
|
|
|
|
|
# VIDEO_PREP: Decodes an input video file into images and a video header.
|
|
|
|
|
node {
|
|
|
|
|
calculator: "OpenCvVideoDecoderCalculator"
|
|
|
|
|
input_side_packet: "INPUT_FILE_PATH:input_video_path"
|
|
|
|
|
output_stream: "VIDEO:video_raw"
|
|
|
|
|
output_stream: "VIDEO_PRESTREAM:video_header"
|
|
|
|
|
output_side_packet: "SAVED_AUDIO_PATH:audio_path"
|
|
|
|
|
}
|
|
|
|
|
|
|
|
|
|
# VIDEO_PREP: Scale the input video before feature extraction.
|
|
|
|
|
node {
|
|
|
|
|
calculator: "ScaleImageCalculator"
|
|
|
|
|
input_stream: "FRAMES:video_raw"
|
|
|
|
|
input_stream: "VIDEO_HEADER:video_header"
|
|
|
|
|
output_stream: "FRAMES:video_frames_scaled"
|
|
|
|
|
node_options: {
|
|
|
|
|
[type.googleapis.com/mediapipe.ScaleImageCalculatorOptions]: {
|
|
|
|
|
preserve_aspect_ratio: true
|
|
|
|
|
output_format: SRGB
|
|
|
|
|
target_width: 480
|
|
|
|
|
algorithm: DEFAULT_WITHOUT_UPSCALE
|
|
|
|
|
}
|
|
|
|
|
}
|
|
|
|
|
}
|
|
|
|
|
|
|
|
|
|
# VIDEO_PREP: Create a low frame rate stream for feature extraction.
|
|
|
|
|
node {
|
|
|
|
|
calculator: "PacketThinnerCalculator"
|
|
|
|
|
input_stream: "video_frames_scaled"
|
|
|
|
|
output_stream: "video_frames_scaled_downsampled"
|
|
|
|
|
node_options: {
|
|
|
|
|
[type.googleapis.com/mediapipe.PacketThinnerCalculatorOptions]: {
|
|
|
|
|
thinner_type: ASYNC
|
|
|
|
|
period: 200000
|
|
|
|
|
}
|
|
|
|
|
}
|
|
|
|
|
}
|
|
|
|
|
|
|
|
|
|
# DETECTION: find borders around the video and major background color.
|
|
|
|
|
node {
|
|
|
|
|
calculator: "BorderDetectionCalculator"
|
|
|
|
|
input_stream: "VIDEO:video_raw"
|
|
|
|
|
output_stream: "DETECTED_BORDERS:borders"
|
|
|
|
|
}
|
|
|
|
|
|
|
|
|
|
# DETECTION: find shot/scene boundaries on the full frame rate stream.
|
|
|
|
|
node {
|
|
|
|
|
calculator: "ShotBoundaryCalculator"
|
|
|
|
|
input_stream: "VIDEO:video_frames_scaled"
|
|
|
|
|
output_stream: "IS_SHOT_CHANGE:shot_change"
|
|
|
|
|
options {
|
|
|
|
|
[type.googleapis.com/mediapipe.autoflip.ShotBoundaryCalculatorOptions] {
|
|
|
|
|
min_shot_span: 0.2
|
|
|
|
|
min_motion: 0.3
|
|
|
|
|
window_size: 15
|
|
|
|
|
min_shot_measure: 10
|
|
|
|
|
min_motion_with_shot_measure: 0.05
|
|
|
|
|
}
|
|
|
|
|
}
|
|
|
|
|
}
|
|
|
|
|
|
|
|
|
|
# DETECTION: find faces on the down sampled stream
|
|
|
|
|
node {
|
|
|
|
|
calculator: "AutoFlipFaceDetectionSubgraph"
|
|
|
|
|
input_stream: "VIDEO:video_frames_scaled_downsampled"
|
|
|
|
|
output_stream: "DETECTIONS:face_detections"
|
|
|
|
|
}
|
|
|
|
|
node {
|
|
|
|
|
calculator: "FaceToRegionCalculator"
|
|
|
|
|
input_stream: "VIDEO:video_frames_scaled_downsampled"
|
|
|
|
|
input_stream: "FACES:face_detections"
|
|
|
|
|
output_stream: "REGIONS:face_regions"
|
|
|
|
|
}
|
|
|
|
|
|
|
|
|
|
# DETECTION: find objects on the down sampled stream
|
|
|
|
|
node {
|
|
|
|
|
calculator: "AutoFlipObjectDetectionSubgraph"
|
|
|
|
|
input_stream: "VIDEO:video_frames_scaled_downsampled"
|
|
|
|
|
output_stream: "DETECTIONS:object_detections"
|
|
|
|
|
}
|
|
|
|
|
node {
|
|
|
|
|
calculator: "LocalizationToRegionCalculator"
|
|
|
|
|
input_stream: "DETECTIONS:object_detections"
|
|
|
|
|
output_stream: "REGIONS:object_regions"
|
|
|
|
|
options {
|
|
|
|
|
[type.googleapis.com/mediapipe.autoflip.LocalizationToRegionCalculatorOptions] {
|
|
|
|
|
output_all_signals: true
|
|
|
|
|
}
|
|
|
|
|
}
|
|
|
|
|
}
|
|
|
|
|
|
|
|
|
|
# SIGNAL FUSION: Combine detections (with weights) on each frame
|
|
|
|
|
node {
|
|
|
|
|
calculator: "SignalFusingCalculator"
|
|
|
|
|
input_stream: "shot_change"
|
|
|
|
|
input_stream: "face_regions"
|
|
|
|
|
input_stream: "object_regions"
|
|
|
|
|
output_stream: "salient_regions"
|
|
|
|
|
options {
|
|
|
|
|
[type.googleapis.com/mediapipe.autoflip.SignalFusingCalculatorOptions] {
|
|
|
|
|
signal_settings {
|
|
|
|
|
type { standard: FACE_CORE_LANDMARKS }
|
|
|
|
|
min_score: 0.85
|
|
|
|
|
max_score: 0.9
|
|
|
|
|
is_required: false
|
|
|
|
|
}
|
|
|
|
|
signal_settings {
|
|
|
|
|
type { standard: FACE_ALL_LANDMARKS }
|
|
|
|
|
min_score: 0.8
|
|
|
|
|
max_score: 0.85
|
|
|
|
|
is_required: false
|
|
|
|
|
}
|
|
|
|
|
signal_settings {
|
|
|
|
|
type { standard: FACE_FULL }
|
|
|
|
|
min_score: 0.8
|
|
|
|
|
max_score: 0.85
|
|
|
|
|
is_required: false
|
|
|
|
|
}
|
|
|
|
|
signal_settings {
|
|
|
|
|
type: { standard: HUMAN }
|
|
|
|
|
min_score: 0.75
|
|
|
|
|
max_score: 0.8
|
|
|
|
|
is_required: false
|
|
|
|
|
}
|
|
|
|
|
signal_settings {
|
|
|
|
|
type: { standard: PET }
|
|
|
|
|
min_score: 0.7
|
|
|
|
|
max_score: 0.75
|
|
|
|
|
is_required: false
|
|
|
|
|
}
|
|
|
|
|
signal_settings {
|
|
|
|
|
type: { standard: CAR }
|
|
|
|
|
min_score: 0.7
|
|
|
|
|
max_score: 0.75
|
|
|
|
|
is_required: false
|
|
|
|
|
}
|
|
|
|
|
signal_settings {
|
|
|
|
|
type: { standard: OBJECT }
|
|
|
|
|
min_score: 0.1
|
|
|
|
|
max_score: 0.2
|
|
|
|
|
is_required: false
|
|
|
|
|
}
|
|
|
|
|
}
|
|
|
|
|
}
|
|
|
|
|
}
|
|
|
|
|
|
|
|
|
|
# CROPPING: make decisions about how to crop each frame.
|
|
|
|
|
node {
|
|
|
|
|
calculator: "SceneCroppingCalculator"
|
|
|
|
|
input_side_packet: "EXTERNAL_ASPECT_RATIO:aspect_ratio"
|
|
|
|
|
input_stream: "VIDEO_FRAMES:video_raw"
|
|
|
|
|
input_stream: "KEY_FRAMES:video_frames_scaled_downsampled"
|
|
|
|
|
input_stream: "DETECTION_FEATURES:salient_regions"
|
|
|
|
|
input_stream: "STATIC_FEATURES:borders"
|
|
|
|
|
input_stream: "SHOT_BOUNDARIES:shot_change"
|
|
|
|
|
output_stream: "CROPPED_FRAMES:cropped_frames"
|
|
|
|
|
node_options: {
|
|
|
|
|
[type.googleapis.com/mediapipe.autoflip.SceneCroppingCalculatorOptions]: {
|
|
|
|
|
max_scene_size: 600
|
|
|
|
|
key_frame_crop_options: {
|
|
|
|
|
score_aggregation_type: CONSTANT
|
|
|
|
|
}
|
|
|
|
|
scene_camera_motion_analyzer_options: {
|
|
|
|
|
motion_stabilization_threshold_percent: 0.5
|
|
|
|
|
salient_point_bound: 0.499
|
|
|
|
|
}
|
|
|
|
|
padding_parameters: {
|
|
|
|
|
blur_cv_size: 200
|
|
|
|
|
overlay_opacity: 0.6
|
|
|
|
|
}
|
|
|
|
|
target_size_type: MAXIMIZE_TARGET_DIMENSION
|
|
|
|
|
}
|
|
|
|
|
}
|
|
|
|
|
}
|
|
|
|
|
|
|
|
|
|
# ENCODING(required): encode the video stream for the final cropped output.
|
|
|
|
|
node {
|
|
|
|
|
calculator: "VideoPreStreamCalculator"
|
|
|
|
|
# Fetch frame format and dimension from input frames.
|
|
|
|
|
input_stream: "FRAME:cropped_frames"
|
|
|
|
|
# Copying frame rate and duration from original video.
|
|
|
|
|
input_stream: "VIDEO_PRESTREAM:video_header"
|
|
|
|
|
output_stream: "output_frames_video_header"
|
|
|
|
|
}
|
|
|
|
|
|
|
|
|
|
node {
|
|
|
|
|
calculator: "OpenCvVideoEncoderCalculator"
|
|
|
|
|
input_stream: "VIDEO:cropped_frames"
|
|
|
|
|
input_stream: "VIDEO_PRESTREAM:output_frames_video_header"
|
|
|
|
|
input_side_packet: "OUTPUT_FILE_PATH:output_video_path"
|
|
|
|
|
input_side_packet: "AUDIO_FILE_PATH:audio_path"
|
|
|
|
|
node_options: {
|
|
|
|
|
[type.googleapis.com/mediapipe.OpenCvVideoEncoderCalculatorOptions]: {
|
|
|
|
|
codec: "avc1"
|
|
|
|
|
video_format: "mp4"
|
|
|
|
|
}
|
|
|
|
|
}
|
|
|
|
|
}
|
|
|
|
|
```
|
|
|
|
|
|
|
|
|
|
## Advanced Parameters
|
|
|
|
|
|
|
|
|
|
### Required vs. Best-Effort Saliency Features
|
|
|
|
|
|
|
|
|
|
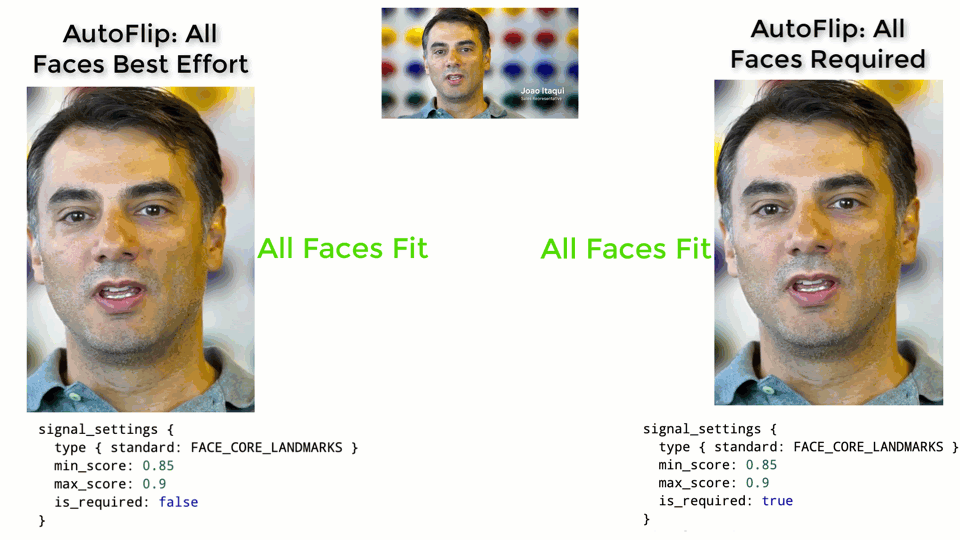
AutoFlip allows users to implement and specify custom features to be used in the
|
|
|
|
|
camera trajectory computation. If the user would like to detect and preserve
|
|
|
|
|
scenes of lions in a wildlife protection video, for example, they could
|
|
|
|
|
implement and add a feature detection calculator for lions into the pipeline.
|
|
|
|
|
Refer to `AutoFlipFaceDetectionSubgraph` and `FaceToRegionCalculator`, or
|
|
|
|
|
`AutoFlipObjectDetectionSubgraph` and `LocalizationToRegionCalculator` for
|
|
|
|
|
examples of how to create new feature detection calculators.
|
|
|
|
|
|
|
|
|
|
After adding different feature signals into the graph, use the
|
|
|
|
|
`SignalFusingCalculator` node to specify types and weights for different feature
|
|
|
|
|
signals. For example, in the graph above, we specified a `face_region` and an
|
|
|
|
|
`object_region` input streams, to represent face signals and agnostic object
|
|
|
|
|
signals, respectively.
|
|
|
|
|
|
|
|
|
|
The larger the weight, the more important the features will be considered when
|
|
|
|
|
AutoFlip computes the camera trajectory. Use the `is_required` flag to mark a
|
|
|
|
|
feature as a hard constraint, in which case the computed camera trajectory will
|
|
|
|
|
try best to cover these feature types in the cropped videos. If for some reason
|
|
|
|
|
the required features cannot be all covered (for example, when they are too
|
|
|
|
|
spread out in the video), AutoFlip will apply a padding effect to cover as much
|
|
|
|
|
salient content as possible. See an illustration below.
|
|
|
|
|
|
2022-09-06 23:29:51 +02:00
|
|
|
|
2020-06-06 01:49:27 +02:00
|
|
|
|
|
|
|
|
### Stable vs Tracking Camera Motion
|
|
|
|
|
|
|
|
|
|
AutoFlip makes a decision on each scene whether to have the cropped viewpoint
|
|
|
|
|
follow an object or if the crop should remain stable (centered on detected
|
|
|
|
|
objects). The parameter `motion_stabilization_threshold_percent` value is used
|
|
|
|
|
to make the decision to track action or keep the camera stable. If, over the
|
|
|
|
|
duration of the scene, all detected focus objects remain within this ratio of
|
|
|
|
|
the frame (e.g. 0.5 = 50% or 1920 * .5 = 960 pixels on 1080p video) then the
|
|
|
|
|
camera is held steady. Otherwise the camera tracks activity within the frame.
|
|
|
|
|
|
|
|
|
|
### Snap To Center
|
|
|
|
|
|
|
|
|
|
For some scenes the camera viewpoint will remain stable at the center of
|
|
|
|
|
activity (see `motion_stabilization_threshold_percent` setting). In this case,
|
|
|
|
|
if the determined best stable viewpoint is within
|
|
|
|
|
`snap_center_max_distance_percent` of the frame's center the camera will be
|
|
|
|
|
shifted to be locked to the center of the frame. This setting is useful for
|
|
|
|
|
videos where the camera operator did a good job already centering content or if
|
|
|
|
|
titles and logos are expected to appear in the center of the frame. It may be
|
|
|
|
|
less useful on raw content where objects are not already well positioned on
|
|
|
|
|
screen.
|
|
|
|
|
|
|
|
|
|
### Visualization to Facilitate Debugging
|
|
|
|
|
|
|
|
|
|
`SceneCroppingCalculator` provides two extra output streams
|
|
|
|
|
`KEY_FRAME_CROP_REGION_VIZ_FRAMES` and `SALIENT_POINT_FRAME_VIZ_FRAMES` to
|
|
|
|
|
visualize the cropping window as well as salient points detected on each frame.
|
|
|
|
|
You could modify the `SceneCroppingCalculator` node like below to enable these
|
|
|
|
|
two output streams.
|
|
|
|
|
|
|
|
|
|
```bash
|
|
|
|
|
node {
|
|
|
|
|
calculator: "SceneCroppingCalculator"
|
|
|
|
|
input_side_packet: "EXTERNAL_ASPECT_RATIO:aspect_ratio"
|
|
|
|
|
input_stream: "VIDEO_FRAMES:video_raw"
|
|
|
|
|
input_stream: "KEY_FRAMES:video_frames_scaled_downsampled"
|
|
|
|
|
input_stream: "DETECTION_FEATURES:salient_regions"
|
|
|
|
|
input_stream: "STATIC_FEATURES:borders"
|
|
|
|
|
input_stream: "SHOT_BOUNDARIES:shot_change"
|
|
|
|
|
output_stream: "CROPPED_FRAMES:cropped_frames"
|
|
|
|
|
output_stream: "KEY_FRAME_CROP_REGION_VIZ_FRAMES:key_frame_crop_viz_frames"
|
|
|
|
|
output_stream: "SALIENT_POINT_FRAME_VIZ_FRAMES:salient_point_viz_frames"
|
|
|
|
|
node_options: {
|
|
|
|
|
[type.googleapis.com/mediapipe.autoflip.SceneCroppingCalculatorOptions]: {
|
|
|
|
|
max_scene_size: 600
|
|
|
|
|
key_frame_crop_options: {
|
|
|
|
|
score_aggregation_type: CONSTANT
|
|
|
|
|
}
|
|
|
|
|
scene_camera_motion_analyzer_options: {
|
|
|
|
|
motion_stabilization_threshold_percent: 0.5
|
|
|
|
|
salient_point_bound: 0.499
|
|
|
|
|
}
|
|
|
|
|
padding_parameters: {
|
|
|
|
|
blur_cv_size: 200
|
|
|
|
|
overlay_opacity: 0.6
|
|
|
|
|
}
|
|
|
|
|
target_size_type: MAXIMIZE_TARGET_DIMENSION
|
|
|
|
|
}
|
|
|
|
|
}
|
|
|
|
|
}
|
|
|
|
|
```
|