2020-08-13 03:57:56 +02:00
|
|
|
|
---
|
|
|
|
|
|
layout: default
|
|
|
|
|
|
title: Pose
|
|
|
|
|
|
parent: Solutions
|
2021-02-27 22:09:58 +01:00
|
|
|
|
has_children: true
|
|
|
|
|
|
has_toc: false
|
2020-08-13 03:57:56 +02:00
|
|
|
|
nav_order: 5
|
|
|
|
|
|
---
|
|
|
|
|
|
|
2020-11-05 01:02:35 +01:00
|
|
|
|
# MediaPipe Pose
|
2020-08-13 03:57:56 +02:00
|
|
|
|
{: .no_toc }
|
|
|
|
|
|
|
2020-12-10 04:13:05 +01:00
|
|
|
|
<details close markdown="block">
|
|
|
|
|
|
<summary>
|
|
|
|
|
|
Table of contents
|
|
|
|
|
|
</summary>
|
|
|
|
|
|
{: .text-delta }
|
2020-08-13 03:57:56 +02:00
|
|
|
|
1. TOC
|
|
|
|
|
|
{:toc}
|
2020-12-10 04:13:05 +01:00
|
|
|
|
</details>
|
2020-08-13 03:57:56 +02:00
|
|
|
|
---
|
|
|
|
|
|
|
2023-03-01 18:19:12 +01:00
|
|
|
|
**Attention:** *Thank you for your interest in MediaPipe Solutions.
|
|
|
|
|
|
As of March 1, 2023, this solution is planned to be upgraded to a new MediaPipe
|
|
|
|
|
|
Solution. For more information, see the new
|
|
|
|
|
|
[MediaPipe Solutions](https://developers.google.com/mediapipe/solutions/guide#legacy)
|
|
|
|
|
|
site.*
|
|
|
|
|
|
|
|
|
|
|
|
*This notice and web page will be removed on April 3, 2023.*
|
|
|
|
|
|
|
|
|
|
|
|
----
|
|
|
|
|
|
|
2020-08-13 03:57:56 +02:00
|
|
|
|
## Overview
|
|
|
|
|
|
|
|
|
|
|
|
Human pose estimation from video plays a critical role in various applications
|
2021-02-27 22:09:58 +01:00
|
|
|
|
such as [quantifying physical exercises](./pose_classification.md), sign
|
|
|
|
|
|
language recognition, and full-body gesture control. For example, it can form
|
|
|
|
|
|
the basis for yoga, dance, and fitness applications. It can also enable the
|
2021-02-27 09:21:16 +01:00
|
|
|
|
overlay of digital content and information on top of the physical world in
|
|
|
|
|
|
augmented reality.
|
2020-08-13 03:57:56 +02:00
|
|
|
|
|
2020-12-10 04:13:05 +01:00
|
|
|
|
MediaPipe Pose is a ML solution for high-fidelity body pose tracking, inferring
|
2021-08-19 00:18:12 +02:00
|
|
|
|
33 3D landmarks and background segmentation mask on the whole body from RGB
|
|
|
|
|
|
video frames utilizing our
|
2020-08-13 21:02:55 +02:00
|
|
|
|
[BlazePose](https://ai.googleblog.com/2020/08/on-device-real-time-body-pose-tracking.html)
|
2020-12-10 04:13:05 +01:00
|
|
|
|
research that also powers the
|
|
|
|
|
|
[ML Kit Pose Detection API](https://developers.google.com/ml-kit/vision/pose-detection).
|
|
|
|
|
|
Current state-of-the-art approaches rely primarily on powerful desktop
|
2020-08-13 21:02:55 +02:00
|
|
|
|
environments for inference, whereas our method achieves real-time performance on
|
|
|
|
|
|
most modern [mobile phones](#mobile), [desktops/laptops](#desktop), in
|
2021-02-27 09:21:16 +01:00
|
|
|
|
[python](#python-solution-api) and even on the [web](#javascript-solution-api).
|
2020-08-13 03:57:56 +02:00
|
|
|
|
|
2022-09-06 23:29:51 +02:00
|
|
|
|
 |
|
2021-05-05 03:30:15 +02:00
|
|
|
|
:----------------------------------------------------------------------: |
|
|
|
|
|
|
*Fig 1. Example of MediaPipe Pose for pose tracking.* |
|
2020-08-13 03:57:56 +02:00
|
|
|
|
|
|
|
|
|
|
## ML Pipeline
|
|
|
|
|
|
|
|
|
|
|
|
The solution utilizes a two-step detector-tracker ML pipeline, proven to be
|
|
|
|
|
|
effective in our [MediaPipe Hands](./hands.md) and
|
|
|
|
|
|
[MediaPipe Face Mesh](./face_mesh.md) solutions. Using a detector, the pipeline
|
2020-12-10 04:13:05 +01:00
|
|
|
|
first locates the person/pose region-of-interest (ROI) within the frame. The
|
2021-08-19 00:18:12 +02:00
|
|
|
|
tracker subsequently predicts the pose landmarks and segmentation mask within
|
|
|
|
|
|
the ROI using the ROI-cropped frame as input. Note that for video use cases the
|
|
|
|
|
|
detector is invoked only as needed, i.e., for the very first frame and when the
|
|
|
|
|
|
tracker could no longer identify body pose presence in the previous frame. For
|
|
|
|
|
|
other frames the pipeline simply derives the ROI from the previous frame’s pose
|
2020-12-10 04:13:05 +01:00
|
|
|
|
landmarks.
|
2020-08-13 03:57:56 +02:00
|
|
|
|
|
|
|
|
|
|
The pipeline is implemented as a MediaPipe
|
2020-12-10 04:13:05 +01:00
|
|
|
|
[graph](https://github.com/google/mediapipe/tree/master/mediapipe/graphs/pose_tracking/pose_tracking_gpu.pbtxt)
|
2020-08-13 03:57:56 +02:00
|
|
|
|
that uses a
|
2020-12-10 04:13:05 +01:00
|
|
|
|
[pose landmark subgraph](https://github.com/google/mediapipe/tree/master/mediapipe/modules/pose_landmark/pose_landmark_gpu.pbtxt)
|
2020-08-13 03:57:56 +02:00
|
|
|
|
from the
|
|
|
|
|
|
[pose landmark module](https://github.com/google/mediapipe/tree/master/mediapipe/modules/pose_landmark)
|
|
|
|
|
|
and renders using a dedicated
|
2020-12-10 04:13:05 +01:00
|
|
|
|
[pose renderer subgraph](https://github.com/google/mediapipe/tree/master/mediapipe/graphs/pose_tracking/subgraphs/pose_renderer_gpu.pbtxt).
|
2020-08-13 03:57:56 +02:00
|
|
|
|
The
|
2020-12-10 04:13:05 +01:00
|
|
|
|
[pose landmark subgraph](https://github.com/google/mediapipe/tree/master/mediapipe/modules/pose_landmark/pose_landmark_gpu.pbtxt)
|
2020-08-13 03:57:56 +02:00
|
|
|
|
internally uses a
|
|
|
|
|
|
[pose detection subgraph](https://github.com/google/mediapipe/tree/master/mediapipe/modules/pose_detection/pose_detection_gpu.pbtxt)
|
|
|
|
|
|
from the
|
|
|
|
|
|
[pose detection module](https://github.com/google/mediapipe/tree/master/mediapipe/modules/pose_detection).
|
|
|
|
|
|
|
|
|
|
|
|
Note: To visualize a graph, copy the graph and paste it into
|
|
|
|
|
|
[MediaPipe Visualizer](https://viz.mediapipe.dev/). For more information on how
|
|
|
|
|
|
to visualize its associated subgraphs, please see
|
|
|
|
|
|
[visualizer documentation](../tools/visualizer.md).
|
|
|
|
|
|
|
2021-05-05 03:30:15 +02:00
|
|
|
|
## Pose Estimation Quality
|
|
|
|
|
|
|
|
|
|
|
|
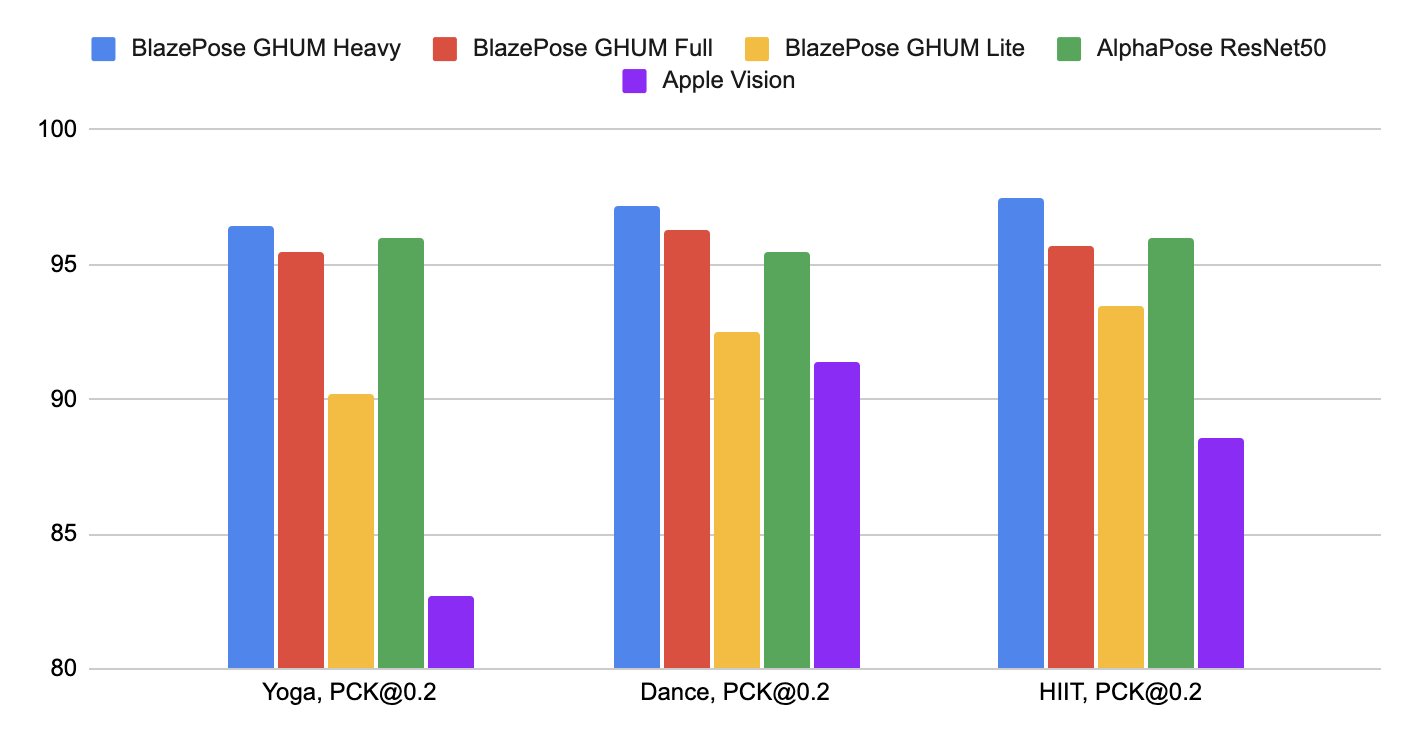
To evaluate the quality of our [models](./models.md#pose) against other
|
2021-05-10 21:19:00 +02:00
|
|
|
|
well-performing publicly available solutions, we use three different validation
|
|
|
|
|
|
datasets, representing different verticals: Yoga, Dance and HIIT. Each image
|
2021-05-05 03:30:15 +02:00
|
|
|
|
contains only a single person located 2-4 meters from the camera. To be
|
|
|
|
|
|
consistent with other solutions, we perform evaluation only for 17 keypoints
|
|
|
|
|
|
from [COCO topology](https://cocodataset.org/#keypoints-2020).
|
|
|
|
|
|
|
2021-05-10 21:19:00 +02:00
|
|
|
|
Method | Yoga <br/> [`mAP`] | Yoga <br/> [`PCK@0.2`] | Dance <br/> [`mAP`] | Dance <br/> [`PCK@0.2`] | HIIT <br/> [`mAP`] | HIIT <br/> [`PCK@0.2`]
|
|
|
|
|
|
----------------------------------------------------------------------------------------------------- | -----------------: | ---------------------: | ------------------: | ----------------------: | -----------------: | ---------------------:
|
2021-09-14 01:56:21 +02:00
|
|
|
|
BlazePose GHUM Heavy | 68.1 | **96.4** | 73.0 | **97.2** | 74.0 | **97.5**
|
|
|
|
|
|
BlazePose GHUM Full | 62.6 | **95.5** | 67.4 | **96.3** | 68.0 | **95.7**
|
|
|
|
|
|
BlazePose GHUM Lite | 45.0 | **90.2** | 53.6 | **92.5** | 53.8 | **93.5**
|
|
|
|
|
|
[AlphaPose ResNet50](https://github.com/MVIG-SJTU/AlphaPose) | 63.4 | **96.0** | 57.8 | **95.5** | 63.4 | **96.0**
|
|
|
|
|
|
[Apple Vision](https://developer.apple.com/documentation/vision/detecting_human_body_poses_in_images) | 32.8 | **82.7** | 36.4 | **91.4** | 44.5 | **88.6**
|
2021-05-10 21:19:00 +02:00
|
|
|
|
|
2022-09-06 23:29:51 +02:00
|
|
|
|
 |
|
2021-05-10 21:19:00 +02:00
|
|
|
|
:--------------------------------------------------------------------------: |
|
|
|
|
|
|
*Fig 2. Quality evaluation in [`PCK@0.2`].* |
|
|
|
|
|
|
|
|
|
|
|
|
We designed our models specifically for live perception use cases, so all of
|
|
|
|
|
|
them work in real-time on the majority of modern devices.
|
|
|
|
|
|
|
2021-09-14 01:56:21 +02:00
|
|
|
|
Method | Latency <br/> Pixel 3 [TFLite GPU](https://www.tensorflow.org/lite/performance/gpu_advanced) | Latency <br/> MacBook Pro (15-inch 2017)
|
|
|
|
|
|
-------------------- | -------------------------------------------------------------------------------------------: | ---------------------------------------:
|
|
|
|
|
|
BlazePose GHUM Heavy | 53 ms | 38 ms
|
|
|
|
|
|
BlazePose GHUM Full | 25 ms | 27 ms
|
|
|
|
|
|
BlazePose GHUM Lite | 20 ms | 25 ms
|
2021-05-05 03:30:15 +02:00
|
|
|
|
|
2020-08-13 03:57:56 +02:00
|
|
|
|
## Models
|
|
|
|
|
|
|
2020-12-10 04:13:05 +01:00
|
|
|
|
### Person/pose Detection Model (BlazePose Detector)
|
2020-08-13 03:57:56 +02:00
|
|
|
|
|
|
|
|
|
|
The detector is inspired by our own lightweight
|
|
|
|
|
|
[BlazeFace](https://arxiv.org/abs/1907.05047) model, used in
|
|
|
|
|
|
[MediaPipe Face Detection](./face_detection.md), as a proxy for a person
|
|
|
|
|
|
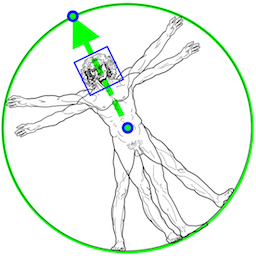
detector. It explicitly predicts two additional virtual keypoints that firmly
|
|
|
|
|
|
describe the human body center, rotation and scale as a circle. Inspired by
|
|
|
|
|
|
[Leonardo’s Vitruvian man](https://en.wikipedia.org/wiki/Vitruvian_Man), we
|
|
|
|
|
|
predict the midpoint of a person's hips, the radius of a circle circumscribing
|
|
|
|
|
|
the whole person, and the incline angle of the line connecting the shoulder and
|
|
|
|
|
|
hip midpoints.
|
|
|
|
|
|
|
2022-09-06 23:29:51 +02:00
|
|
|
|
 |
|
2020-08-13 03:57:56 +02:00
|
|
|
|
:----------------------------------------------------------------------------------------------------: |
|
2021-05-10 21:19:00 +02:00
|
|
|
|
*Fig 3. Vitruvian man aligned via two virtual keypoints predicted by BlazePose detector in addition to the face bounding box.* |
|
2020-08-13 03:57:56 +02:00
|
|
|
|
|
2021-10-18 21:39:29 +02:00
|
|
|
|
### Pose Landmark Model (BlazePose [GHUM](https://github.com/google-research/google-research/tree/master/ghum) 3D)
|
2020-08-13 03:57:56 +02:00
|
|
|
|
|
2021-05-05 03:30:15 +02:00
|
|
|
|
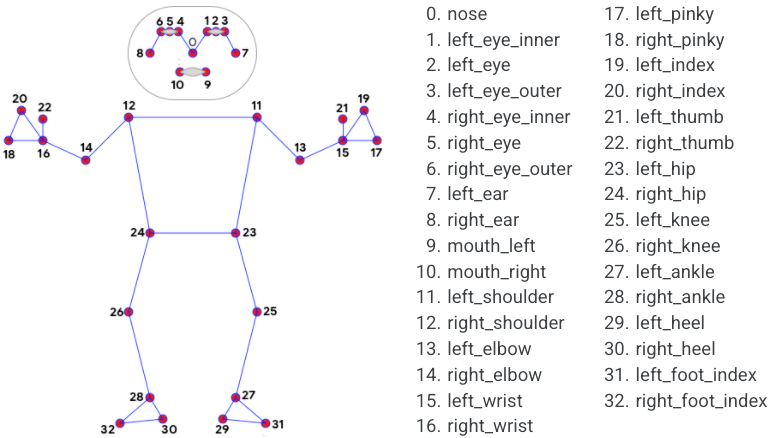
The landmark model in MediaPipe Pose predicts the location of 33 pose landmarks
|
|
|
|
|
|
(see figure below).
|
2020-08-13 03:57:56 +02:00
|
|
|
|
|
2022-09-06 23:29:51 +02:00
|
|
|
|
 |
|
2020-12-10 04:13:05 +01:00
|
|
|
|
:----------------------------------------------------------------------------------------------: |
|
2021-05-10 21:19:00 +02:00
|
|
|
|
*Fig 4. 33 pose landmarks.* |
|
2020-08-13 03:57:56 +02:00
|
|
|
|
|
2021-08-19 00:18:12 +02:00
|
|
|
|
Optionally, MediaPipe Pose can predicts a full-body
|
|
|
|
|
|
[segmentation mask](#segmentation_mask) represented as a two-class segmentation
|
|
|
|
|
|
(human or background).
|
|
|
|
|
|
|
|
|
|
|
|
Please find more detail in the
|
|
|
|
|
|
[BlazePose Google AI Blog](https://ai.googleblog.com/2020/08/on-device-real-time-body-pose-tracking.html),
|
|
|
|
|
|
this [paper](https://arxiv.org/abs/2006.10204),
|
2021-09-01 22:49:12 +02:00
|
|
|
|
[the model card](./models.md#pose) and the [Output](#output) section below.
|
2021-08-19 00:18:12 +02:00
|
|
|
|
|
2020-12-10 04:13:05 +01:00
|
|
|
|
## Solution APIs
|
2020-08-13 03:57:56 +02:00
|
|
|
|
|
2020-12-10 04:13:05 +01:00
|
|
|
|
### Cross-platform Configuration Options
|
2020-08-13 03:57:56 +02:00
|
|
|
|
|
2020-12-10 04:13:05 +01:00
|
|
|
|
Naming style and availability may differ slightly across platforms/languages.
|
2020-08-13 03:57:56 +02:00
|
|
|
|
|
2020-12-10 04:13:05 +01:00
|
|
|
|
#### static_image_mode
|
2020-08-13 03:57:56 +02:00
|
|
|
|
|
2020-12-10 04:13:05 +01:00
|
|
|
|
If set to `false`, the solution treats the input images as a video stream. It
|
|
|
|
|
|
will try to detect the most prominent person in the very first images, and upon
|
|
|
|
|
|
a successful detection further localizes the pose landmarks. In subsequent
|
|
|
|
|
|
images, it then simply tracks those landmarks without invoking another detection
|
|
|
|
|
|
until it loses track, on reducing computation and latency. If set to `true`,
|
|
|
|
|
|
person detection runs every input image, ideal for processing a batch of static,
|
|
|
|
|
|
possibly unrelated, images. Default to `false`.
|
2020-08-13 03:57:56 +02:00
|
|
|
|
|
2021-05-05 03:30:15 +02:00
|
|
|
|
#### model_complexity
|
2020-08-13 03:57:56 +02:00
|
|
|
|
|
2021-05-05 03:30:15 +02:00
|
|
|
|
Complexity of the pose landmark model: `0`, `1` or `2`. Landmark accuracy as
|
|
|
|
|
|
well as inference latency generally go up with the model complexity. Default to
|
|
|
|
|
|
`1`.
|
2020-08-13 03:57:56 +02:00
|
|
|
|
|
2020-12-10 04:13:05 +01:00
|
|
|
|
#### smooth_landmarks
|
2020-08-13 03:57:56 +02:00
|
|
|
|
|
2020-12-10 04:13:05 +01:00
|
|
|
|
If set to `true`, the solution filters pose landmarks across different input
|
|
|
|
|
|
images to reduce jitter, but ignored if [static_image_mode](#static_image_mode)
|
|
|
|
|
|
is also set to `true`. Default to `true`.
|
2020-08-13 03:57:56 +02:00
|
|
|
|
|
2021-08-19 00:18:12 +02:00
|
|
|
|
#### enable_segmentation
|
|
|
|
|
|
|
|
|
|
|
|
If set to `true`, in addition to the pose landmarks the solution also generates
|
|
|
|
|
|
the segmentation mask. Default to `false`.
|
|
|
|
|
|
|
|
|
|
|
|
#### smooth_segmentation
|
|
|
|
|
|
|
|
|
|
|
|
If set to `true`, the solution filters segmentation masks across different input
|
|
|
|
|
|
images to reduce jitter. Ignored if [enable_segmentation](#enable_segmentation)
|
|
|
|
|
|
is `false` or [static_image_mode](#static_image_mode) is `true`. Default to
|
|
|
|
|
|
`true`.
|
|
|
|
|
|
|
2020-12-10 04:13:05 +01:00
|
|
|
|
#### min_detection_confidence
|
2020-11-05 01:02:35 +01:00
|
|
|
|
|
2020-12-10 04:13:05 +01:00
|
|
|
|
Minimum confidence value (`[0.0, 1.0]`) from the person-detection model for the
|
|
|
|
|
|
detection to be considered successful. Default to `0.5`.
|
2020-08-30 05:41:10 +02:00
|
|
|
|
|
2020-12-10 04:13:05 +01:00
|
|
|
|
#### min_tracking_confidence
|
2020-08-13 03:57:56 +02:00
|
|
|
|
|
2020-12-10 04:13:05 +01:00
|
|
|
|
Minimum confidence value (`[0.0, 1.0]`) from the landmark-tracking model for the
|
|
|
|
|
|
pose landmarks to be considered tracked successfully, or otherwise person
|
|
|
|
|
|
detection will be invoked automatically on the next input image. Setting it to a
|
|
|
|
|
|
higher value can increase robustness of the solution, at the expense of a higher
|
|
|
|
|
|
latency. Ignored if [static_image_mode](#static_image_mode) is `true`, where
|
|
|
|
|
|
person detection simply runs on every image. Default to `0.5`.
|
|
|
|
|
|
|
|
|
|
|
|
### Output
|
|
|
|
|
|
|
|
|
|
|
|
Naming style may differ slightly across platforms/languages.
|
|
|
|
|
|
|
|
|
|
|
|
#### pose_landmarks
|
|
|
|
|
|
|
2021-06-03 22:13:30 +02:00
|
|
|
|
A list of pose landmarks. Each landmark consists of the following:
|
2020-12-10 04:13:05 +01:00
|
|
|
|
|
|
|
|
|
|
* `x` and `y`: Landmark coordinates normalized to `[0.0, 1.0]` by the image
|
|
|
|
|
|
width and height respectively.
|
2021-02-27 09:21:16 +01:00
|
|
|
|
* `z`: Represents the landmark depth with the depth at the midpoint of hips
|
|
|
|
|
|
being the origin, and the smaller the value the closer the landmark is to
|
|
|
|
|
|
the camera. The magnitude of `z` uses roughly the same scale as `x`.
|
2020-12-10 04:13:05 +01:00
|
|
|
|
* `visibility`: A value in `[0.0, 1.0]` indicating the likelihood of the
|
|
|
|
|
|
landmark being visible (present and not occluded) in the image.
|
2020-08-13 03:57:56 +02:00
|
|
|
|
|
2021-06-24 23:10:25 +02:00
|
|
|
|
#### pose_world_landmarks
|
|
|
|
|
|
|
|
|
|
|
|
*Fig 5. Example of MediaPipe Pose real-world 3D coordinates.* |
|
|
|
|
|
|
:-----------------------------------------------------------: |
|
2022-09-28 22:35:30 +02:00
|
|
|
|
<video autoplay muted loop preload style="height: auto; width: 480px"><source src="https://mediapipe.dev/images/mobile/pose_world_landmarks.mp4" type="video/mp4"></video> |
|
2021-06-24 23:10:25 +02:00
|
|
|
|
|
|
|
|
|
|
Another list of pose landmarks in world coordinates. Each landmark consists of
|
|
|
|
|
|
the following:
|
|
|
|
|
|
|
|
|
|
|
|
* `x`, `y` and `z`: Real-world 3D coordinates in meters with the origin at the
|
|
|
|
|
|
center between hips.
|
|
|
|
|
|
* `visibility`: Identical to that defined in the corresponding
|
|
|
|
|
|
[pose_landmarks](#pose_landmarks).
|
|
|
|
|
|
|
2021-08-19 00:18:12 +02:00
|
|
|
|
#### segmentation_mask
|
|
|
|
|
|
|
|
|
|
|
|
The output segmentation mask, predicted only when
|
|
|
|
|
|
[enable_segmentation](#enable_segmentation) is set to `true`. The mask has the
|
|
|
|
|
|
same width and height as the input image, and contains values in `[0.0, 1.0]`
|
|
|
|
|
|
where `1.0` and `0.0` indicate high certainty of a "human" and "background"
|
|
|
|
|
|
pixel respectively. Please refer to the platform-specific usage examples below
|
|
|
|
|
|
for usage details.
|
|
|
|
|
|
|
|
|
|
|
|
*Fig 6. Example of MediaPipe Pose segmentation mask.* |
|
2021-09-14 01:56:21 +02:00
|
|
|
|
:---------------------------------------------------: |
|
2022-09-28 22:35:30 +02:00
|
|
|
|
<video autoplay muted loop preload style="height: auto; width: 480px"><source src="https://mediapipe.dev/images/mobile/pose_segmentation.mp4" type="video/mp4"></video> |
|
2021-08-19 00:18:12 +02:00
|
|
|
|
|
2020-12-10 04:13:05 +01:00
|
|
|
|
### Python Solution API
|
2020-11-05 01:02:35 +01:00
|
|
|
|
|
2020-12-10 04:13:05 +01:00
|
|
|
|
Please first follow general [instructions](../getting_started/python.md) to
|
2021-02-27 09:21:16 +01:00
|
|
|
|
install MediaPipe Python package, then learn more in the companion
|
2021-06-03 22:13:30 +02:00
|
|
|
|
[Python Colab](#resources) and the usage example below.
|
2020-12-10 04:13:05 +01:00
|
|
|
|
|
|
|
|
|
|
Supported configuration options:
|
|
|
|
|
|
|
|
|
|
|
|
* [static_image_mode](#static_image_mode)
|
2021-05-05 03:30:15 +02:00
|
|
|
|
* [model_complexity](#model_complexity)
|
2020-12-10 04:13:05 +01:00
|
|
|
|
* [smooth_landmarks](#smooth_landmarks)
|
2021-08-19 00:18:12 +02:00
|
|
|
|
* [enable_segmentation](#enable_segmentation)
|
|
|
|
|
|
* [smooth_segmentation](#smooth_segmentation)
|
2020-12-10 04:13:05 +01:00
|
|
|
|
* [min_detection_confidence](#min_detection_confidence)
|
|
|
|
|
|
* [min_tracking_confidence](#min_tracking_confidence)
|
2020-11-05 01:02:35 +01:00
|
|
|
|
|
|
|
|
|
|
```python
|
|
|
|
|
|
import cv2
|
2023-03-04 18:28:12 +01:00
|
|
|
|
import numpy as np
|
2020-11-05 01:02:35 +01:00
|
|
|
|
import mediapipe as mp
|
|
|
|
|
|
mp_drawing = mp.solutions.drawing_utils
|
2021-08-19 00:18:12 +02:00
|
|
|
|
mp_drawing_styles = mp.solutions.drawing_styles
|
2020-11-05 01:02:35 +01:00
|
|
|
|
mp_pose = mp.solutions.pose
|
|
|
|
|
|
|
|
|
|
|
|
# For static images:
|
2021-06-03 22:13:30 +02:00
|
|
|
|
IMAGE_FILES = []
|
2021-08-19 00:18:12 +02:00
|
|
|
|
BG_COLOR = (192, 192, 192) # gray
|
2021-02-27 09:21:16 +01:00
|
|
|
|
with mp_pose.Pose(
|
2021-05-05 03:30:15 +02:00
|
|
|
|
static_image_mode=True,
|
|
|
|
|
|
model_complexity=2,
|
2021-08-19 00:18:12 +02:00
|
|
|
|
enable_segmentation=True,
|
2021-05-05 03:30:15 +02:00
|
|
|
|
min_detection_confidence=0.5) as pose:
|
2021-06-03 22:13:30 +02:00
|
|
|
|
for idx, file in enumerate(IMAGE_FILES):
|
2021-02-27 09:21:16 +01:00
|
|
|
|
image = cv2.imread(file)
|
|
|
|
|
|
image_height, image_width, _ = image.shape
|
|
|
|
|
|
# Convert the BGR image to RGB before processing.
|
|
|
|
|
|
results = pose.process(cv2.cvtColor(image, cv2.COLOR_BGR2RGB))
|
|
|
|
|
|
|
|
|
|
|
|
if not results.pose_landmarks:
|
|
|
|
|
|
continue
|
|
|
|
|
|
print(
|
|
|
|
|
|
f'Nose coordinates: ('
|
2021-09-01 22:49:12 +02:00
|
|
|
|
f'{results.pose_landmarks.landmark[mp_pose.PoseLandmark.NOSE].x * image_width}, '
|
|
|
|
|
|
f'{results.pose_landmarks.landmark[mp_pose.PoseLandmark.NOSE].y * image_height})'
|
2021-02-27 09:21:16 +01:00
|
|
|
|
)
|
2021-08-19 00:18:12 +02:00
|
|
|
|
|
2021-02-27 09:21:16 +01:00
|
|
|
|
annotated_image = image.copy()
|
2021-08-19 00:18:12 +02:00
|
|
|
|
# Draw segmentation on the image.
|
|
|
|
|
|
# To improve segmentation around boundaries, consider applying a joint
|
|
|
|
|
|
# bilateral filter to "results.segmentation_mask" with "image".
|
|
|
|
|
|
condition = np.stack((results.segmentation_mask,) * 3, axis=-1) > 0.1
|
|
|
|
|
|
bg_image = np.zeros(image.shape, dtype=np.uint8)
|
|
|
|
|
|
bg_image[:] = BG_COLOR
|
|
|
|
|
|
annotated_image = np.where(condition, annotated_image, bg_image)
|
|
|
|
|
|
# Draw pose landmarks on the image.
|
2021-02-27 09:21:16 +01:00
|
|
|
|
mp_drawing.draw_landmarks(
|
2021-08-19 00:18:12 +02:00
|
|
|
|
annotated_image,
|
|
|
|
|
|
results.pose_landmarks,
|
|
|
|
|
|
mp_pose.POSE_CONNECTIONS,
|
|
|
|
|
|
landmark_drawing_spec=mp_drawing_styles.get_default_pose_landmarks_style())
|
2021-02-27 09:21:16 +01:00
|
|
|
|
cv2.imwrite('/tmp/annotated_image' + str(idx) + '.png', annotated_image)
|
2021-06-24 23:10:25 +02:00
|
|
|
|
# Plot pose world landmarks.
|
|
|
|
|
|
mp_drawing.plot_landmarks(
|
|
|
|
|
|
results.pose_world_landmarks, mp_pose.POSE_CONNECTIONS)
|
2020-11-05 01:02:35 +01:00
|
|
|
|
|
|
|
|
|
|
# For webcam input:
|
|
|
|
|
|
cap = cv2.VideoCapture(0)
|
2021-02-27 09:21:16 +01:00
|
|
|
|
with mp_pose.Pose(
|
|
|
|
|
|
min_detection_confidence=0.5,
|
|
|
|
|
|
min_tracking_confidence=0.5) as pose:
|
|
|
|
|
|
while cap.isOpened():
|
|
|
|
|
|
success, image = cap.read()
|
|
|
|
|
|
if not success:
|
|
|
|
|
|
print("Ignoring empty camera frame.")
|
|
|
|
|
|
# If loading a video, use 'break' instead of 'continue'.
|
|
|
|
|
|
continue
|
|
|
|
|
|
|
|
|
|
|
|
# To improve performance, optionally mark the image as not writeable to
|
|
|
|
|
|
# pass by reference.
|
|
|
|
|
|
image.flags.writeable = False
|
2021-10-06 22:44:33 +02:00
|
|
|
|
image = cv2.cvtColor(image, cv2.COLOR_BGR2RGB)
|
2021-02-27 09:21:16 +01:00
|
|
|
|
results = pose.process(image)
|
|
|
|
|
|
|
|
|
|
|
|
# Draw the pose annotation on the image.
|
|
|
|
|
|
image.flags.writeable = True
|
|
|
|
|
|
image = cv2.cvtColor(image, cv2.COLOR_RGB2BGR)
|
|
|
|
|
|
mp_drawing.draw_landmarks(
|
2021-08-19 00:18:12 +02:00
|
|
|
|
image,
|
|
|
|
|
|
results.pose_landmarks,
|
|
|
|
|
|
mp_pose.POSE_CONNECTIONS,
|
|
|
|
|
|
landmark_drawing_spec=mp_drawing_styles.get_default_pose_landmarks_style())
|
2021-10-06 22:44:33 +02:00
|
|
|
|
# Flip the image horizontally for a selfie-view display.
|
|
|
|
|
|
cv2.imshow('MediaPipe Pose', cv2.flip(image, 1))
|
2021-02-27 09:21:16 +01:00
|
|
|
|
if cv2.waitKey(5) & 0xFF == 27:
|
|
|
|
|
|
break
|
2020-11-05 01:02:35 +01:00
|
|
|
|
cap.release()
|
2020-08-13 03:57:56 +02:00
|
|
|
|
```
|
|
|
|
|
|
|
2020-12-10 04:13:05 +01:00
|
|
|
|
### JavaScript Solution API
|
|
|
|
|
|
|
|
|
|
|
|
Please first see general [introduction](../getting_started/javascript.md) on
|
2021-02-27 09:21:16 +01:00
|
|
|
|
MediaPipe in JavaScript, then learn more in the companion [web demo](#resources)
|
|
|
|
|
|
and the following usage example.
|
2020-12-10 04:13:05 +01:00
|
|
|
|
|
|
|
|
|
|
Supported configuration options:
|
|
|
|
|
|
|
2021-05-05 03:30:15 +02:00
|
|
|
|
* [modelComplexity](#model_complexity)
|
2020-12-10 04:13:05 +01:00
|
|
|
|
* [smoothLandmarks](#smooth_landmarks)
|
2021-08-19 00:18:12 +02:00
|
|
|
|
* [enableSegmentation](#enable_segmentation)
|
|
|
|
|
|
* [smoothSegmentation](#smooth_segmentation)
|
2020-12-10 04:13:05 +01:00
|
|
|
|
* [minDetectionConfidence](#min_detection_confidence)
|
|
|
|
|
|
* [minTrackingConfidence](#min_tracking_confidence)
|
|
|
|
|
|
|
|
|
|
|
|
```html
|
|
|
|
|
|
<!DOCTYPE html>
|
|
|
|
|
|
<html>
|
|
|
|
|
|
<head>
|
|
|
|
|
|
<meta charset="utf-8">
|
|
|
|
|
|
<script src="https://cdn.jsdelivr.net/npm/@mediapipe/camera_utils/camera_utils.js" crossorigin="anonymous"></script>
|
|
|
|
|
|
<script src="https://cdn.jsdelivr.net/npm/@mediapipe/control_utils/control_utils.js" crossorigin="anonymous"></script>
|
2022-03-21 20:07:37 +01:00
|
|
|
|
<script src="https://cdn.jsdelivr.net/npm/@mediapipe/control_utils_3d/control_utils_3d.js" crossorigin="anonymous"></script>
|
2020-12-10 04:13:05 +01:00
|
|
|
|
<script src="https://cdn.jsdelivr.net/npm/@mediapipe/drawing_utils/drawing_utils.js" crossorigin="anonymous"></script>
|
|
|
|
|
|
<script src="https://cdn.jsdelivr.net/npm/@mediapipe/pose/pose.js" crossorigin="anonymous"></script>
|
|
|
|
|
|
</head>
|
|
|
|
|
|
|
|
|
|
|
|
<body>
|
|
|
|
|
|
<div class="container">
|
|
|
|
|
|
<video class="input_video"></video>
|
|
|
|
|
|
<canvas class="output_canvas" width="1280px" height="720px"></canvas>
|
2021-09-01 22:49:12 +02:00
|
|
|
|
<div class="landmark-grid-container"></div>
|
2020-12-10 04:13:05 +01:00
|
|
|
|
</div>
|
|
|
|
|
|
</body>
|
|
|
|
|
|
</html>
|
|
|
|
|
|
```
|
2020-08-30 05:41:10 +02:00
|
|
|
|
|
2020-12-10 04:13:05 +01:00
|
|
|
|
```javascript
|
|
|
|
|
|
<script type="module">
|
|
|
|
|
|
const videoElement = document.getElementsByClassName('input_video')[0];
|
|
|
|
|
|
const canvasElement = document.getElementsByClassName('output_canvas')[0];
|
|
|
|
|
|
const canvasCtx = canvasElement.getContext('2d');
|
2021-06-24 23:10:25 +02:00
|
|
|
|
const landmarkContainer = document.getElementsByClassName('landmark-grid-container')[0];
|
|
|
|
|
|
const grid = new LandmarkGrid(landmarkContainer);
|
2020-12-10 04:13:05 +01:00
|
|
|
|
|
|
|
|
|
|
function onResults(results) {
|
2021-06-24 23:10:25 +02:00
|
|
|
|
if (!results.poseLandmarks) {
|
|
|
|
|
|
grid.updateLandmarks([]);
|
|
|
|
|
|
return;
|
|
|
|
|
|
}
|
|
|
|
|
|
|
2020-12-10 04:13:05 +01:00
|
|
|
|
canvasCtx.save();
|
|
|
|
|
|
canvasCtx.clearRect(0, 0, canvasElement.width, canvasElement.height);
|
2021-08-19 00:18:12 +02:00
|
|
|
|
canvasCtx.drawImage(results.segmentationMask, 0, 0,
|
|
|
|
|
|
canvasElement.width, canvasElement.height);
|
|
|
|
|
|
|
|
|
|
|
|
// Only overwrite existing pixels.
|
|
|
|
|
|
canvasCtx.globalCompositeOperation = 'source-in';
|
|
|
|
|
|
canvasCtx.fillStyle = '#00FF00';
|
|
|
|
|
|
canvasCtx.fillRect(0, 0, canvasElement.width, canvasElement.height);
|
|
|
|
|
|
|
|
|
|
|
|
// Only overwrite missing pixels.
|
|
|
|
|
|
canvasCtx.globalCompositeOperation = 'destination-atop';
|
2020-12-10 04:13:05 +01:00
|
|
|
|
canvasCtx.drawImage(
|
|
|
|
|
|
results.image, 0, 0, canvasElement.width, canvasElement.height);
|
2021-08-19 00:18:12 +02:00
|
|
|
|
|
|
|
|
|
|
canvasCtx.globalCompositeOperation = 'source-over';
|
2020-12-10 04:13:05 +01:00
|
|
|
|
drawConnectors(canvasCtx, results.poseLandmarks, POSE_CONNECTIONS,
|
|
|
|
|
|
{color: '#00FF00', lineWidth: 4});
|
|
|
|
|
|
drawLandmarks(canvasCtx, results.poseLandmarks,
|
|
|
|
|
|
{color: '#FF0000', lineWidth: 2});
|
|
|
|
|
|
canvasCtx.restore();
|
2021-06-24 23:10:25 +02:00
|
|
|
|
|
|
|
|
|
|
grid.updateLandmarks(results.poseWorldLandmarks);
|
2020-12-10 04:13:05 +01:00
|
|
|
|
}
|
|
|
|
|
|
|
|
|
|
|
|
const pose = new Pose({locateFile: (file) => {
|
|
|
|
|
|
return `https://cdn.jsdelivr.net/npm/@mediapipe/pose/${file}`;
|
|
|
|
|
|
}});
|
|
|
|
|
|
pose.setOptions({
|
2021-05-05 03:30:15 +02:00
|
|
|
|
modelComplexity: 1,
|
2020-12-10 04:13:05 +01:00
|
|
|
|
smoothLandmarks: true,
|
2021-08-19 00:18:12 +02:00
|
|
|
|
enableSegmentation: true,
|
|
|
|
|
|
smoothSegmentation: true,
|
2020-12-10 04:13:05 +01:00
|
|
|
|
minDetectionConfidence: 0.5,
|
|
|
|
|
|
minTrackingConfidence: 0.5
|
|
|
|
|
|
});
|
|
|
|
|
|
pose.onResults(onResults);
|
|
|
|
|
|
|
|
|
|
|
|
const camera = new Camera(videoElement, {
|
|
|
|
|
|
onFrame: async () => {
|
|
|
|
|
|
await pose.send({image: videoElement});
|
|
|
|
|
|
},
|
|
|
|
|
|
width: 1280,
|
|
|
|
|
|
height: 720
|
|
|
|
|
|
});
|
|
|
|
|
|
camera.start();
|
|
|
|
|
|
</script>
|
|
|
|
|
|
```
|
2020-08-13 03:57:56 +02:00
|
|
|
|
|
2020-12-10 04:13:05 +01:00
|
|
|
|
## Example Apps
|
|
|
|
|
|
|
|
|
|
|
|
Please first see general instructions for
|
|
|
|
|
|
[Android](../getting_started/android.md), [iOS](../getting_started/ios.md), and
|
|
|
|
|
|
[desktop](../getting_started/cpp.md) on how to build MediaPipe examples.
|
|
|
|
|
|
|
|
|
|
|
|
Note: To visualize a graph, copy the graph and paste it into
|
|
|
|
|
|
[MediaPipe Visualizer](https://viz.mediapipe.dev/). For more information on how
|
|
|
|
|
|
to visualize its associated subgraphs, please see
|
|
|
|
|
|
[visualizer documentation](../tools/visualizer.md).
|
|
|
|
|
|
|
|
|
|
|
|
### Mobile
|
|
|
|
|
|
|
|
|
|
|
|
#### Main Example
|
|
|
|
|
|
|
|
|
|
|
|
* Graph:
|
|
|
|
|
|
[`mediapipe/graphs/pose_tracking/pose_tracking_gpu.pbtxt`](https://github.com/google/mediapipe/tree/master/mediapipe/graphs/pose_tracking/pose_tracking_gpu.pbtxt)
|
|
|
|
|
|
* Android target:
|
|
|
|
|
|
[(or download prebuilt ARM64 APK)](https://drive.google.com/file/d/17GFIrqEJS6W8UHKXlYevTtSCLxN9pWlY/view?usp=sharing)
|
|
|
|
|
|
[`mediapipe/examples/android/src/java/com/google/mediapipe/apps/posetrackinggpu:posetrackinggpu`](https://github.com/google/mediapipe/tree/master/mediapipe/examples/android/src/java/com/google/mediapipe/apps/posetrackinggpu/BUILD)
|
|
|
|
|
|
* iOS target:
|
|
|
|
|
|
[`mediapipe/examples/ios/posetrackinggpu:PoseTrackingGpuApp`](http:/mediapipe/examples/ios/posetrackinggpu/BUILD)
|
|
|
|
|
|
|
|
|
|
|
|
### Desktop
|
|
|
|
|
|
|
|
|
|
|
|
Please first see general instructions for [desktop](../getting_started/cpp.md)
|
|
|
|
|
|
on how to build MediaPipe examples.
|
|
|
|
|
|
|
|
|
|
|
|
#### Main Example
|
|
|
|
|
|
|
|
|
|
|
|
* Running on CPU
|
|
|
|
|
|
* Graph:
|
|
|
|
|
|
[`mediapipe/graphs/pose_tracking/pose_tracking_cpu.pbtxt`](https://github.com/google/mediapipe/tree/master/mediapipe/graphs/pose_tracking/pose_tracking_cpu.pbtxt)
|
|
|
|
|
|
* Target:
|
|
|
|
|
|
[`mediapipe/examples/desktop/pose_tracking:pose_tracking_cpu`](https://github.com/google/mediapipe/tree/master/mediapipe/examples/desktop/pose_tracking/BUILD)
|
|
|
|
|
|
* Running on GPU
|
|
|
|
|
|
* Graph:
|
|
|
|
|
|
[`mediapipe/graphs/pose_tracking/pose_tracking_gpu.pbtxt`](https://github.com/google/mediapipe/tree/master/mediapipe/graphs/pose_tracking/pose_tracking_gpu.pbtxt)
|
|
|
|
|
|
* Target:
|
|
|
|
|
|
[`mediapipe/examples/desktop/pose_tracking:pose_tracking_gpu`](https://github.com/google/mediapipe/tree/master/mediapipe/examples/desktop/pose_tracking/BUILD)
|
|
|
|
|
|
|
2020-08-13 03:57:56 +02:00
|
|
|
|
## Resources
|
|
|
|
|
|
|
|
|
|
|
|
* Google AI Blog:
|
2020-08-13 21:02:55 +02:00
|
|
|
|
[BlazePose - On-device Real-time Body Pose Tracking](https://ai.googleblog.com/2020/08/on-device-real-time-body-pose-tracking.html)
|
2020-08-13 03:57:56 +02:00
|
|
|
|
* Paper:
|
|
|
|
|
|
[BlazePose: On-device Real-time Body Pose Tracking](https://arxiv.org/abs/2006.10204)
|
|
|
|
|
|
([presentation](https://youtu.be/YPpUOTRn5tA))
|
2020-09-16 03:31:50 +02:00
|
|
|
|
* [Models and model cards](./models.md#pose)
|
2021-10-18 21:39:29 +02:00
|
|
|
|
* [GHUM & GHUML: Generative 3D Human Shape and Articulated Pose Models](https://github.com/google-research/google-research/tree/master/ghum)
|
2021-02-27 09:21:16 +01:00
|
|
|
|
* [Web demo](https://code.mediapipe.dev/codepen/pose)
|
|
|
|
|
|
* [Python Colab](https://mediapipe.page.link/pose_py_colab)
|
2021-05-10 21:19:00 +02:00
|
|
|
|
|
|
|
|
|
|
[`mAP`]: https://cocodataset.org/#keypoints-eval
|
2021-05-11 06:52:16 +02:00
|
|
|
|
[`PCK@0.2`]: https://github.com/cbsudux/Human-Pose-Estimation-101
|